Warrior III (Virabhadrasana III): benefits, alignment, and how to practice


At a glance
- Best for: Improving balance, glute strength, hip stability, and core control
- Difficulty: Intermediate, beginner-friendly with props
- Typical hold: 3 to 5 slow breaths
- Primary focus: Single-leg stability, level hips, and body awareness
- Main challenge: Keeping the pelvis stable while reaching forward and back
- Modify if: You have ankle, knee, hip, hamstring, lower back, or balance concerns
Warrior III looks simple from the outside: one leg standing, one leg reaching back, the body extending forward. But anyone who has practiced it knows how quickly the pose tells the truth. The standing foot wobbles. The lifted hip wants to open. The breath disappears.
At YOGI TIMES, we see Warrior III less as a pose about “perfect balance” and more as a lesson in how the whole body organizes itself around one clear line of attention. When the standing foot is steady, the hips are level, the spine is long, and the breath remains calm, Virabhadrasana III becomes a powerful practice for strength, focus, coordination, and self-awareness.
In short
Warrior III is an intermediate standing balance pose that strengthens the legs, glutes, core, back, and ankles while improving focus and body awareness.
The most common mistake is trying to lift the back leg too high before the standing leg and hips are stable. If you lose balance, lower the lifted leg, soften the standing knee, use a wall or blocks, and focus on creating one long line from the crown of the head through the lifted heel.
Quick pose overview
Why Warrior III feels harder than it looks

One of the biggest misconceptions about Warrior III is that balance depends on the lifted leg. In reality, almost everything happens in the standing leg. The foot, ankle, hip, and deep core constantly make tiny adjustments to keep you upright, often dozens every second. That’s why the pose can feel surprisingly demanding even for people who are strong or flexible.
After more than three decades of practicing yoga and watching students learn this posture, I’ve noticed that most people don’t lose balance because they aren’t strong enough. They lose it because they try to create the final shape before building a stable foundation. The instinct is usually to lift the back leg higher or lean farther forward. Ironically, doing a little less often creates a stronger Warrior III.
Once you understand that the standing foot is the real teacher in this pose, everything begins to change. Instead of chasing height, you start organizing your body from the ground up. Balance becomes less about fighting gravity and more about working with it.
What is Warrior III?
Warrior III (Virabhadrasana III) is an intermediate standing balance pose that combines strength, stability, and concentration into one integrated movement. Balancing on one leg, you hinge your torso forward while extending the opposite leg behind you, creating a long line of energy from the crown of your head to your lifted heel. Although the final shape appears simple, the pose demands continuous coordination between your feet, hips, core, spine, and breath.
You’ll most often encounter Warrior III in Vinyasa Yoga, Power Yoga, and many Hatha Yoga classes, usually flowing from Warrior I, High Lunge, or Crescent Lunge. It also appears in standing balance sequences alongside poses such as Half Moon Pose (Ardha Chandrasana), Standing Splits (Urdhva Prasarita Eka Padasana), and Dancer Pose (Natarajasana), making it an important stepping stone toward more advanced balancing postures.
What makes Warrior III unique is that it doesn’t rely on flexibility alone. Instead, it teaches how seemingly separate parts of the body work together as one. The standing foot grounds, the pelvis stabilizes, the core supports the spine, and the back leg extends with intention. When these elements begin to cooperate, the pose no longer feels like a battle against gravity. It becomes an exploration of balance, efficiency, and body awareness.
Meaning of Virabhadrasana III
The name Virabhadrasana comes from Virabhadra, the legendary warrior created by the Hindu god Shiva. In Sanskrit, vira means hero or warrior, bhadra means auspicious or blessed, and asana means pose. Warrior III is the third posture in the Warrior sequence, following Warrior I (Virabhadrasana I) and Warrior II (Virabhadrasana II).
According to the traditional story, Virabhadra emerged from Shiva’s grief and anger after the death of his wife, Sati. Rather than representing violence for its own sake, Virabhadra symbolizes courage, determination, and the ability to move through adversity with purpose. It’s a story about transformation, turning overwhelming emotion into focused action.
Whether you connect with the mythology or simply enjoy the physical practice, Warrior III reflects many of those same qualities. It asks you to remain steady while moving forward, to stay grounded while reaching into space, and to find confidence without becoming rigid.
One lesson I’ve come to appreciate over years of practice is that Warrior III isn’t about overpowering the pose. The more you force it, the more balance slips away. The posture responds far better to calm attention than brute strength. In many ways, that may be the deeper meaning of the warrior, not someone who conquers through force, but someone who remains clear, present, and composed even when challenged.
For many practitioners, that quiet kind of strength becomes far more valuable than simply holding the posture for a few extra breaths.
Benefits of Warrior III
Warrior III offers far more than better balance. Practiced consistently and with good alignment, it develops strength, coordination, and body awareness in ways that transfer well beyond the yoga mat. Because the pose asks your entire body to work as a connected system rather than as isolated muscles, many practitioners notice improvements in everyday movement, athletic performance, and posture as much as in their yoga practice.
Physical benefits
One of Warrior III’s greatest strengths is how efficiently it builds functional strength. The standing leg works hard to stabilize the ankle, knee, and hip while the glutes and hamstrings generate power to support the pelvis. At the same time, the deep core muscles and spinal stabilizers help maintain a long, neutral spine instead of allowing the body to collapse under gravity.
With regular practice, Warrior III may help:
- strengthen the glutes, hamstrings, quadriceps, calves, and ankles
- improve hip stability and single-leg strength
- develop deep core stability and postural control
- strengthen the muscles that support the spine
- improve balance and proprioception (your body’s awareness of where it is in space)
- encourage better coordination between the upper and lower body
For runners, hikers, skiers, surfers, and many other athletes, this combination of balance and stability often translates into more efficient movement patterns and better control during single-leg activities.
Mental benefits
Few poses demand your full attention quite like Warrior III. The moment your mind wanders, your body usually lets you know.
Rather than forcing concentration, the posture naturally trains it. Your breath, gaze, and movement begin working together, encouraging a quieter, more focused state of mind. Many practitioners also find that the pose builds patience. Progress rarely happens overnight, and each small improvement comes from consistent practice rather than trying harder.
Energetic and emotional benefits
One of the reasons I continue returning to Warrior III after so many years is that it teaches an unusual balance between effort and ease. You need enough strength to remain stable, yet enough softness to adapt to every tiny shift in your body.
That lesson often extends beyond yoga. Life rarely asks us to be perfectly balanced. It asks us to keep adjusting. Warrior III reminds us that steadiness isn’t the absence of movement, it’s the ability to respond to change without losing our center.
What the research says
Several studies suggest that single-leg balance exercises can improve proprioception, postural control, and lower-limb stability. These qualities become increasingly important with age and may help reduce the risk of falls while enhancing athletic performance. Although Warrior III itself hasn’t been extensively studied in isolation, it incorporates many of the same movement patterns commonly used in balance and rehabilitation programs.
Editorial note: Research supports the value of balance training, but the benefits of Warrior III also depend on consistent practice, appropriate technique, and individual health conditions.
Who benefits most from Warrior III?
- Runners looking to improve single-leg stability
- Hikers and trail runners navigating uneven terrain
- Skiers and snowboarders developing lower-body control
- Surfers seeking better balance and hip strength
- Older adults maintaining balance and coordination
- Anyone wanting to build stronger glutes and core stability
- Yoga practitioners preparing for more advanced standing balances
Muscles worked in Warrior III
One reason Warrior III feels so demanding is that almost no part of the body gets to relax. Unlike exercises that isolate a single muscle group, Virabhadrasana III asks dozens of muscles to work together to create stability, balance, and efficient movement. The goal isn’t simply to hold yourself up, it’s to distribute effort throughout the entire body.
The illustration below highlights the primary muscles engaged in Warrior III and shows why maintaining a level pelvis is more important than lifting the back leg higher.
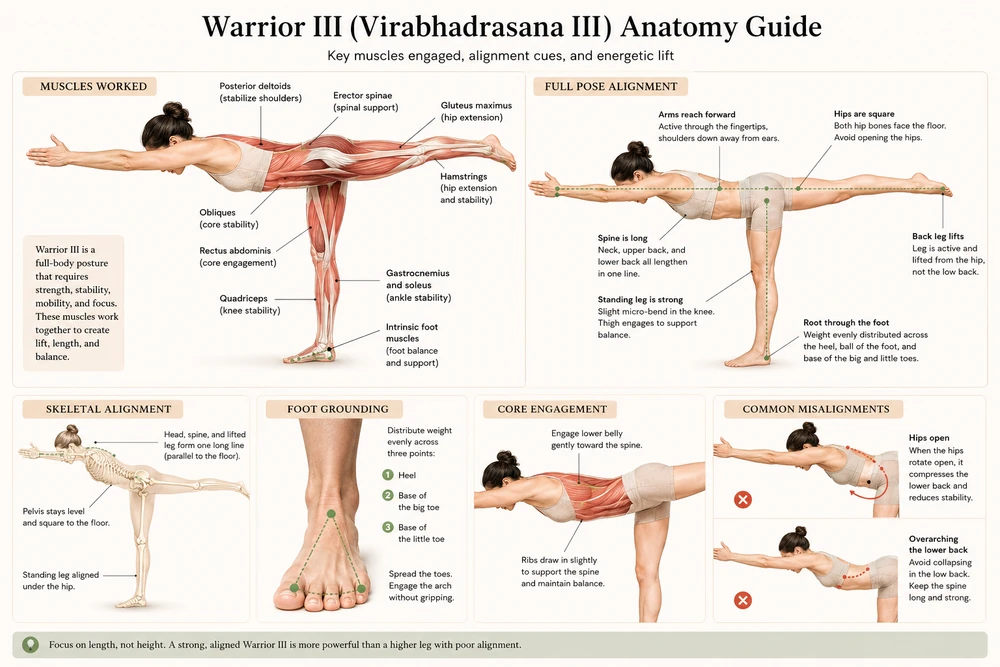
Primary muscles engaged
Gluteus maximus and gluteus medius
The glutes are some of the hardest-working muscles in Warrior III. On the standing leg, they stabilize the pelvis and prevent the hip from collapsing. On the lifted leg, they help extend the hip and create length through the back of the body.
Hamstrings
The hamstrings work in different ways on each leg. The standing hamstrings help stabilize the knee and hip, while the hamstrings of the lifted leg assist in maintaining hip extension and keeping the leg active.
Quadriceps
The quadriceps support the standing leg and help maintain a strong, stable knee. Rather than locking the knee, think of the quadriceps as providing controlled support while keeping a slight softness in the joint.
Deep core muscles
Your transverse abdominis, obliques, and other deep abdominal muscles act like a natural corset around your spine. They don’t simply create a visible “six-pack”; they stabilize the torso so your lower back doesn’t compensate as you lean forward.
Spinal extensors
The erector spinae and other muscles along the back help maintain a long, neutral spine. Instead of collapsing toward the floor, they allow you to reach forward while staying supported.
Supporting muscles
Although they receive less attention, several other muscles contribute significantly to the posture:
- calves and intrinsic foot muscles stabilize the standing foot
- ankle stabilizers continuously adjust your balance
- deltoids and upper back muscles support the arms when they extend overhead
- the latissimus dorsi and lower trapezius help maintain shoulder stability
- the hip adductors work quietly to keep the pelvis centered over the standing leg
One teaching observation I’ve made over the years is that students often think they need stronger abs to improve Warrior III. While core strength certainly helps, the pose usually becomes steadier when the standing foot, hip, and glute begin working more efficiently together. Balance is rarely created by one muscle alone. It’s the result of many muscles cooperating at exactly the right time.
How to do Warrior III step by step
There are several ways to enter Warrior III (Virabhadrasana III), but I find that beginning from Warrior I or High Lunge gives most practitioners the best sense of stability and alignment. Rather than rushing to lift the back leg, think about creating a strong foundation first. The pose becomes much easier when you build it from the standing foot upward.
1. Begin in Warrior I
Step your right foot forward into Warrior I, keeping your front knee bent and your hips facing toward the front of the mat. Take a slow breath and feel your weight settle evenly into your front foot.
2. Shift your weight into the standing leg
As you exhale, begin transferring your weight onto your right foot. Keep a slight bend in the standing knee instead of locking it. This small “micro-bend” allows your leg muscles to support the joint while giving you better balance.
3. Hinge from the hips
Instead of folding from your waist, lengthen your spine and hinge forward from your hip joints. Your chest moves forward as your left leg begins reaching back. Think about creating length before trying to create height.
4. Lift the back leg
Continue extending your left leg behind you until your torso and lifted leg approach parallel with the floor. Don’t worry if you can’t reach parallel immediately. Keeping both hips level is far more important than lifting the leg higher.
5. Find your arm position
Choose the arm variation that allows you to maintain the best alignment:
- Hands at your heart for maximum stability.
- Arms reaching forward beside your ears for a greater challenge.
- Airplane arms extending alongside your body to develop shoulder and back strength.
- Hands on yoga blocks if you’re still developing balance.
Remember that your arms should never compromise the quality of the rest of the posture.
6. Breathe and organize
Instead of trying to stay perfectly still, allow yourself to make small adjustments. Press evenly through your standing foot, gently draw your lower ribs toward your pelvis, and continue reaching through the crown of your head and the lifted heel.
Hold the pose for 3 to 5 slow breaths, or longer if your breathing remains steady and relaxed.
7. Exit with control
To come out of Warrior III, slowly bend your standing knee and step your lifted foot back into Warrior I or High Lunge. Avoid dropping out of the posture. The transition is part of the practice and develops as much control as the pose itself.
A teacher’s tip
One cue has transformed Warrior III for countless students I’ve worked with over the years:
Don’t try to lift your back leg. Instead, imagine someone gently pulling your fingertips forward while another person pulls your heel backward.
When you think about reaching in opposite directions instead of lifting, your spine naturally lengthens, your core engages more efficiently, and balance often becomes noticeably easier. It’s one of those subtle adjustments that can completely change how the pose feels.
Alignment tips for Warrior III
Good alignment in Warrior III isn’t about creating the highest or most dramatic shape. It’s about distributing effort evenly throughout your body so that no single joint or muscle has to compensate for the others. When the pose feels stable, you’ll notice less strain and more length.
Before refining the smaller details, focus on these two foundations: keep your pelvis level and your spine long. Most balance problems in Warrior III begin when one of these two elements is lost.
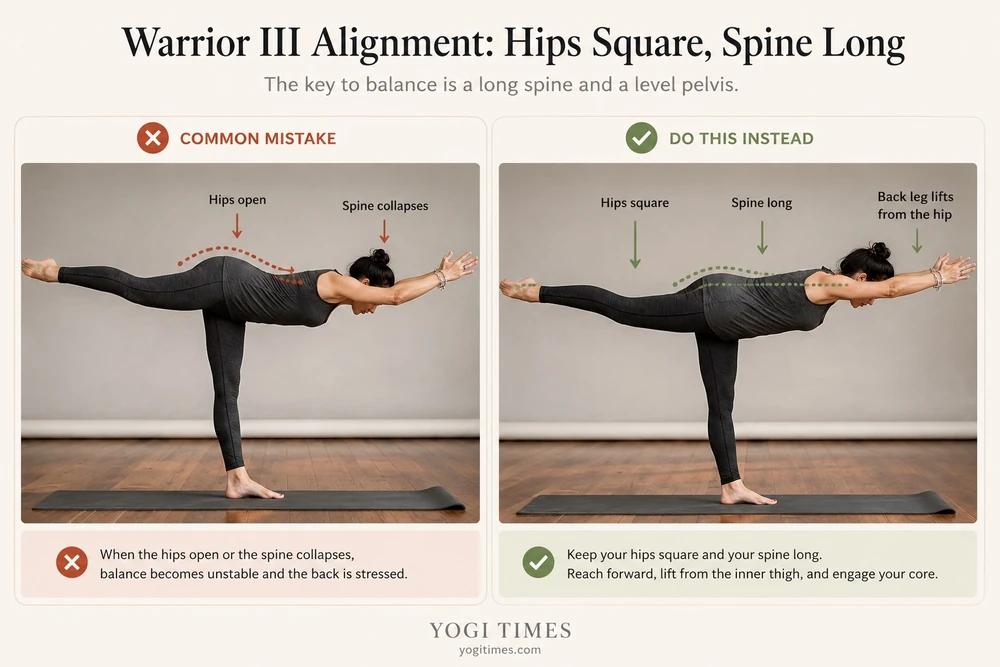
Build the pose from the standing foot
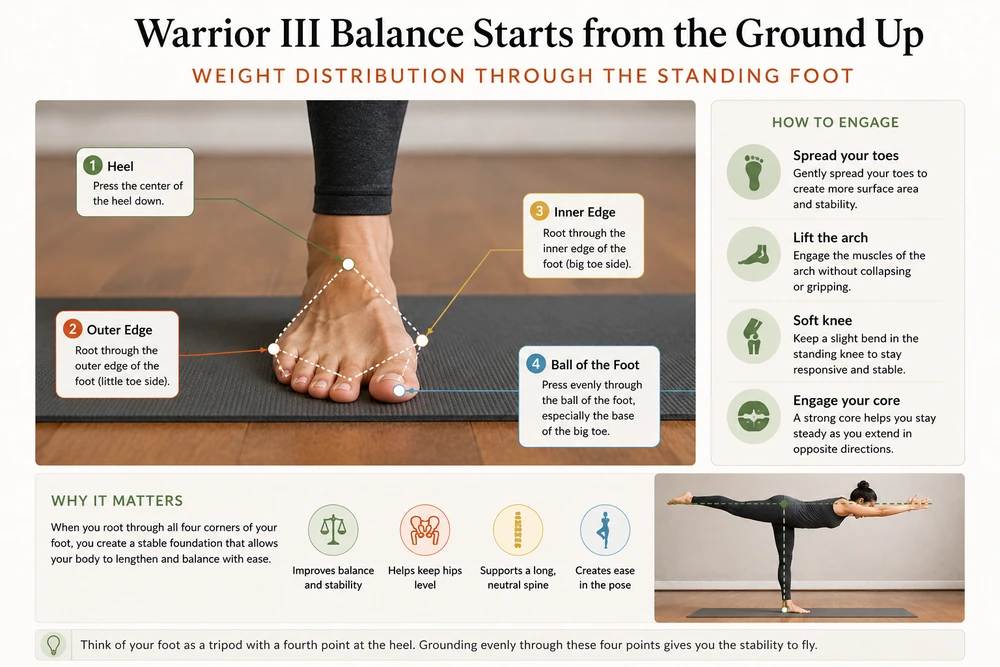
Everything starts with the foot on the floor. Press evenly through the heel, the base of your big toe, and the base of your little toe, the three points often called the foot tripod. Spread your toes naturally without gripping the mat. A stable foot creates a stable ankle, which helps the knee, hip, and pelvis organize above it.
Keep your hips level before lifting higher
One of the easiest ways to lose balance is allowing the lifted hip to rotate open. Instead, imagine both front hip bones acting like headlights, shining directly toward the floor. If keeping your pelvis level means lowering the back leg slightly, choose alignment over height every time.
Lengthen your spine instead of collapsing your chest
As your torso moves forward, resist the temptation to round your upper back or drop your chest toward the floor. Reach forward through the crown of your head while simultaneously extending through the lifted heel. Think of creating length rather than simply leaning forward.
Engage your core without holding your breath
Your abdominal muscles should gently support the spine, not become rigid. Draw your lower ribs in slightly while keeping your breathing smooth and relaxed. If you find yourself holding your breath, you’ve probably moved beyond the point where you can maintain good alignment.
Soften the standing knee
A locked knee rarely creates better balance. Keeping a small, almost invisible bend allows the muscles around the hip and thigh to absorb movement more efficiently and helps prevent unnecessary stress on the joint.
Let your gaze steady the body
Choose a point on the floor several feet in front of you and keep your eyes soft. Looking too far forward often compresses the neck, while looking directly underneath yourself can make balancing more difficult. A calm gaze usually leads to a calmer body.
A teaching observation
One of the biggest shifts I’ve seen in students over the years happens when they stop asking, “How high can I lift my leg?” and begin asking, “How long can I make my body?”
That small change in intention transforms Warrior III. Instead of forcing the pose, the body begins organizing itself naturally. Balance becomes lighter, breathing becomes easier, and the posture feels less like a struggle and more like a conversation between strength and stability.In YOGI TIMES retreats and online classes, Warrior III typically appears later in the standing sequence after these preparation poses.
Teaching insight
One of the biggest misconceptions about Warrior III is that the higher your back leg lifts, the better the pose.
In reality, experienced teachers usually look for a level pelvis before they look for height. If lifting your leg causes your hips to rotate open or your lower back to compress, you’re no longer strengthening the movement pattern Warrior III is designed to develop.
Lowering the lifted leg a few centimeters while keeping your hips square often creates a stronger, safer, and more stable posture.
Common mistakes in Warrior III (and how to fix them)
Every yoga teacher has seen the same patterns appear in Warrior III. The good news is that these mistakes are completely normal, they’re simply your body’s way of searching for balance. Rather than trying harder, small adjustments usually make a much bigger difference than extra effort.
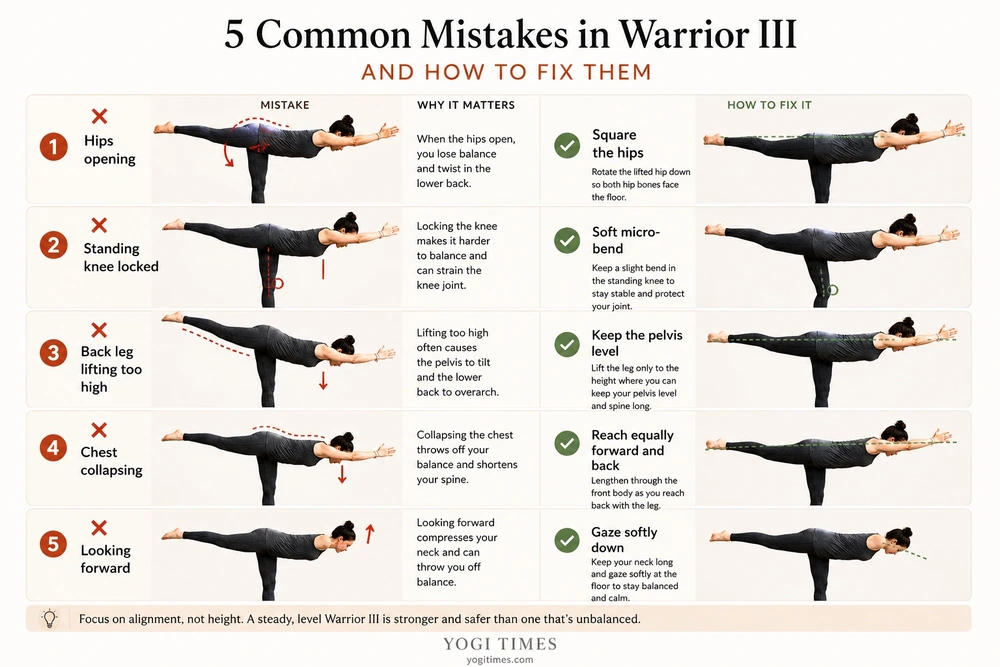
Mistake: Opening the lifted hip
What happens:
As the back leg lifts, the pelvis rotates open and one hip rises higher than the other. This often makes the pose feel easier, but it shifts the work away from the standing leg and changes the intention of the posture.
Try this instead:
Imagine both hip bones pointing toward the floor. Lower your lifted leg if necessary until you can keep your pelvis level. Alignment is always more valuable than height.
Mistake: Locking the standing knee
What happens:
Many practitioners straighten the standing leg so aggressively that the knee hyperextends. This reduces the muscles’ ability to stabilize the joint and often makes balance less reliable.
Try this instead:
Keep a tiny, almost invisible bend in the standing knee while actively engaging your quadriceps and glutes. Think of standing strong, not rigid.
Mistake: Chasing the highest leg
What happens:
Trying to lift the back leg as high as possible often causes the lower back to arch, the ribs to flare, and the pelvis to twist.
Try this instead:
Focus on creating one long line from your head to your heel. A slightly lower leg with excellent alignment is a far stronger expression of Warrior III than a higher leg with a collapsing spine.
Mistake: Looking too far forward
What happens:
Lifting the head to look ahead can compress the back of the neck and throw your center of gravity forward, making balance much harder.
Try this instead:
Keep your neck long and your gaze softly focused on a point on the floor a few feet ahead of you.
Mistake: Holding your breath
What happens:
As the pose becomes challenging, many people unconsciously stop breathing. Tension builds, balance becomes more difficult, and the body feels heavier.
Try this instead:
Maintain slow, even breaths. If you can’t breathe comfortably, ease out of the posture slightly until your breath becomes smooth again.
Mistake: Thinking balance means staying perfectly still
This is perhaps the biggest misconception of all.
Even experienced practitioners are constantly making tiny adjustments through the foot, ankle, hips, and core. Those subtle movements aren’t signs that you’re doing the pose incorrectly, they’re how balance actually works.
I’ve watched thousands of students practice Warrior III over the years, and the people who improve the fastest aren’t the ones who never wobble. They’re the ones who stop judging the wobble. They treat it as feedback, make a small adjustment, and continue breathing.
That’s real balance.
Beginner modifications for Warrior III
One of the biggest misconceptions in yoga is that using props means you’re doing an “easier” version of the pose. In reality, the right modification often allows you to experience the posture more accurately. Instead of fighting to stay upright, you can focus on the qualities Warrior III is meant to develop: stability, alignment, and awareness.
Practice with a wall
If balance feels unpredictable, a wall can become one of your best teachers.
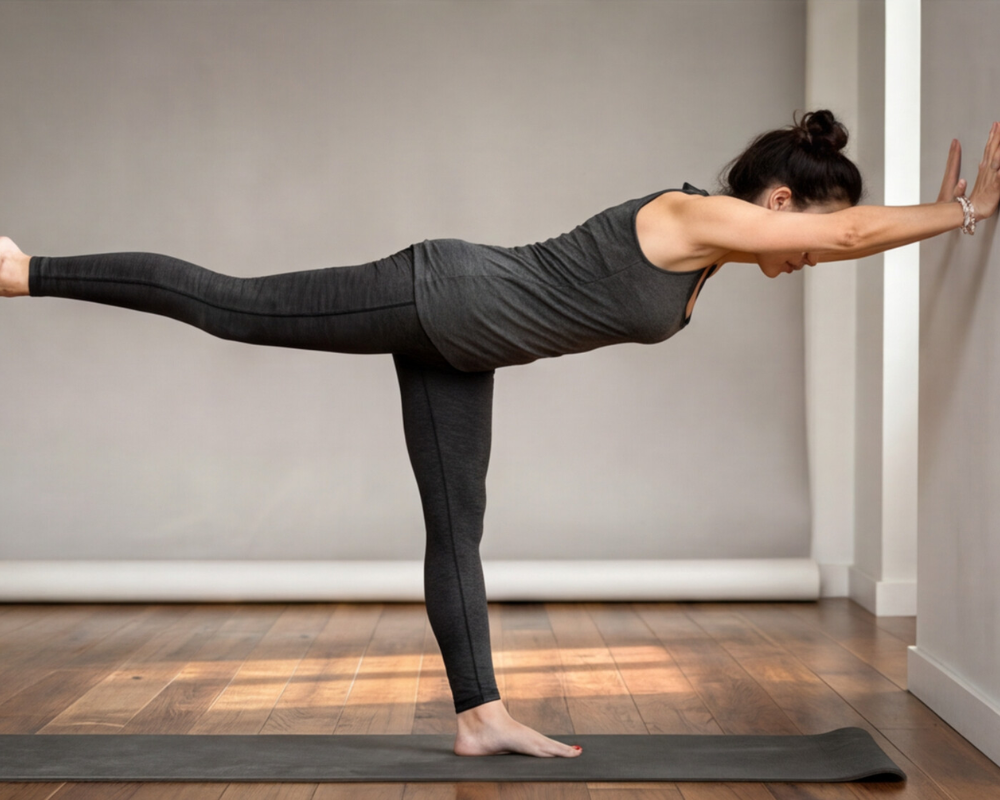
Stand facing a wall with your fingertips lightly touching it as you move into Warrior III. The goal isn’t to lean on the wall but to use it as gentle feedback while you organize your hips and spine.
Another excellent variation is to stand with the wall behind you and press the sole of your lifted foot into it. This often makes it much easier to activate the back leg while keeping the pelvis level.
Use yoga blocks
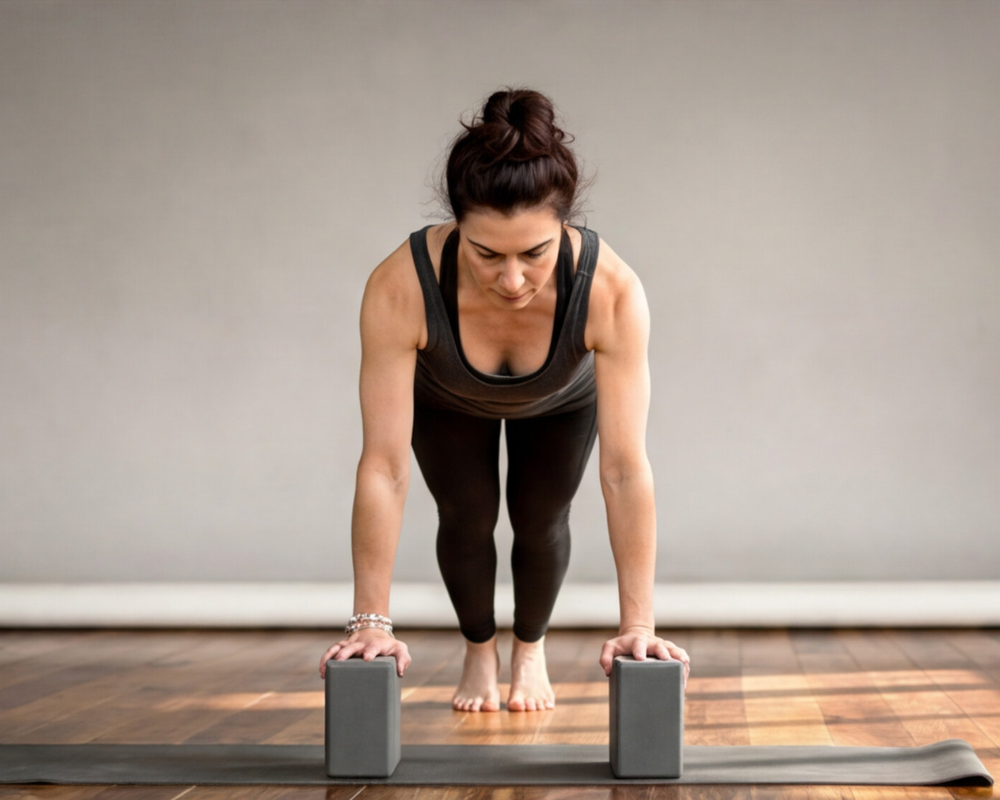
Place one or two yoga blocks beneath your hands before hinging forward.
Blocks reduce the balance challenge without changing the fundamental mechanics of the pose. They also help many students lengthen through the spine instead of rounding the back in an attempt to reach the floor.
Keep your hands at your heart or on your hips
Although reaching the arms overhead is the classic expression of Warrior III, it’s rarely the best place to begin.
Keeping your palms together at your chest, or placing your hands on your hips, allows you to focus on your standing leg and pelvic alignment before adding the extra challenge of supporting the arms.
Keep the back toes lightly on the floor
There’s no rule that says the lifted foot has to leave the ground immediately.
A light “kickstand” with the back toes touching the mat gives your nervous system extra confidence while you learn to shift your weight into the standing leg. As your balance improves, you can gradually begin lifting the foot away from the floor.
Don’t worry about reaching parallel
Many people believe their torso and lifted leg must become perfectly parallel to the floor.
They don’t.
Especially when you’re learning, it’s completely appropriate to keep your chest a little higher and your back leg a little lower. You’ll usually maintain much better alignment, breathe more comfortably, and build the strength needed for the full expression over time.
A teacher’s perspective
One thing I’ve learned after years of practice is that beginners often judge themselves by how the pose looks, while experienced practitioners judge themselves by how the pose feels.
If using a wall helps you keep your hips level, breathe naturally, and understand the mechanics of Warrior III, then you’re not doing a lesser version of the pose. You’re practicing it intelligently.
Ironically, the students who spend time with these simple modifications often progress faster than those who rush toward the full expression before building a solid foundation.
Advanced variations of Warrior III
Once you can hold Warrior III with steady breathing, level hips, and a relaxed face, you can begin exploring more challenging variations. The goal isn’t simply to make the pose harder, it’s to develop greater control, coordination, and body awareness while maintaining the same quality of alignment.
Warrior III with arms overhead
Extending both arms alongside your ears creates the traditional expression of the pose and significantly increases the challenge. Your upper body becomes longer, shifting your center of gravity forward and asking more from your core and standing leg.
Before lifting your arms, make sure you can already maintain a stable pelvis and a long spine.
Airplane Pose (Dekasana)
Instead of reaching forward, extend your arms behind you alongside your body with your palms facing inward.
This variation encourages greater awareness of the upper back and shoulders while allowing many practitioners to keep their chest more open. It’s an excellent option if overhead shoulders feel restrictive or if you’re refining balance before progressing to the classic version.
Warrior III to Half Moon Pose
One of my favorite transitions is moving slowly from Warrior III into Half Moon Pose (Ardha Chandrasana).
Although both are standing balance poses, they challenge the body in completely different ways. Warrior III asks you to keep your hips square to the floor, while Half Moon invites the pelvis to open. Learning to move smoothly between these two positions develops remarkable control through the standing leg and pelvis.
Warrior III to Standing Split
As you become more comfortable balancing, experiment with flowing from Warrior III into Standing Split (Urdhva Prasarita Eka Padasana).
This transition increases the demand on the standing hamstring while improving coordination between stability and mobility. Move slowly and allow the breath, not momentum, to guide the transition.
Eyes closed
Closing your eyes removes visual feedback, forcing your body to rely almost entirely on proprioception and your inner sense of balance.
This variation is surprisingly challenging and should only be practiced after you’ve developed a confident, stable Warrior III. If you’re new to it, practice near a wall for safety.
A teacher’s perspective
I’ve noticed that experienced practitioners often assume progress means attempting more advanced variations. In reality, some of the strongest yoga teachers I know continue practicing the basic form of Warrior III with extraordinary precision.
Complexity isn’t always progression.
Sometimes the greatest challenge is holding the simplest version with complete presence, smooth breathing, and unwavering attention. That’s often where the deepest learning takes place.
Consider modifying Warrior III if you have:
- Recent ankle or knee injuries
- Lower back pain that increases during forward bending
- Hip replacement or recent hip surgery
- Vertigo or balance disorders
- Pregnancy, particularly during the second or third trimester
- Very tight hamstrings that prevent a neutral spine
Using a wall, chair, or yoga blocks allows you to enjoy the benefits of Warrior III while reducing unnecessary strain.
Contraindications and safety tips
Warrior III is a safe and rewarding pose for most healthy practitioners when approached progressively and with good alignment. Like many standing balance postures, however, it isn’t about forcing your body into a shape. Listening to your body is always more important than achieving the textbook version of the pose.
Recent ankle or knee injuries
Because Warrior III places your full body weight on one leg, it can challenge healing ankles, knees, and the surrounding stabilizing muscles. If you’re recovering from an injury, practice with a wall or chair until your strength and confidence return. If you experience pain, not simply muscular effort, ease out of the pose.
Hip injuries or hip replacement
After hip surgery, including a total hip replacement, always follow your surgeon’s and physiotherapist’s recommendations before returning to balance poses.
As someone who underwent a total hip replacement myself, I’ve learned that recovery isn’t about rushing back to the full expression of a posture. It’s about patiently rebuilding trust in the joint, respecting its current range of motion, and allowing strength and stability to develop gradually. Some modifications may remain appropriate for months, and that’s perfectly okay.
Lower back discomfort
If Warrior III causes compression or pain in your lower back, the solution is rarely to push through it.
Instead, try lowering your lifted leg slightly, engaging your deep core muscles more gently, or placing your hands on blocks. In many cases, improving pelvic alignment and creating more length through the spine immediately reduces unnecessary strain.
Vertigo or balance disorders
If you experience dizziness, vertigo, or conditions that affect balance, practice close to a wall or sturdy chair. There’s no benefit in risking a fall simply to hold the full pose.
Pregnancy
Many practitioners comfortably continue modified standing balance poses during pregnancy, particularly in the first trimester. As your center of gravity changes, however, using wall support or choosing more stable alternatives often becomes the safest option. Always follow the advice of your healthcare provider and adapt your practice to how your body feels each day.
Tight hamstrings
Limited hamstring flexibility doesn’t prevent you from practicing Warrior III.
Rather than forcing your torso lower or your back leg higher, allow a slight bend in the standing knee and focus on maintaining a long spine. Over time, mobility usually improves naturally through consistent practice.
A final thought on safety
One of the most valuable lessons yoga has taught me is that there is a difference between discomfort and pain.
Muscular effort, challenge, and even a little wobbling are part of learning. Sharp pain, joint pain, numbness, or instability are not.
Warrior III isn’t a pose to conquer. It’s a pose to explore. The more you respect your body’s signals instead of fighting them, the more sustainable, and enjoyable, your practice becomes.
Teacher cues for Warrior III
Sometimes a single cue can transform a pose more than ten technical instructions. Over the years, these are the cues I’ve found myself returning to again and again when teaching Warrior III. Rather than trying to remember all of them at once, choose one or two that resonate and let them guide your practice.
- Stand into the floor before you reach into space.
- Grow longer instead of lifting higher.
- Press your lifted heel into an imaginary wall behind you.
- Imagine someone gently pulling your fingertips forward and your heel backward.
- Keep both hip bones shining toward the floor.
- Soften your standing knee without sinking into it.
- Breathe before you move. Then let the breath guide the movement.
- Keep the back of your neck as long as the rest of your spine.
- Relax your jaw, your forehead, and your eyes. Balance doesn’t come from tension.
- Wobbling is information, not failure. Respond, don’t react.
- The standing foot is your foundation. Everything else grows from there.
- Find steadiness first. Refinement comes later.
One thing I’ve learned after practicing yoga for many years is that students often remember images better than anatomy. If I tell someone to “activate the gluteus medius,” they may forget it five minutes later. If I ask them to imagine stretching themselves between two opposite walls, their whole body usually organizes itself more naturally.
The best yoga cues don’t force the body into position. They help you discover the position for yourself. That’s one of the reasons I still love teaching Warrior III, it reminds us that learning often happens through simple images rather than complicated instructions.
Preparatory poses for Warrior III
Warrior III rarely exists in isolation. In most yoga classes, it’s preceded by poses that prepare the ankles, hips, hamstrings, and core for the demands of balancing on one leg. Spending a few minutes warming up these areas can make the posture feel noticeably more stable and controlled.
Mountain Pose (Tadasana)
Every standing balance begins with a solid foundation. Mountain Pose teaches you how to distribute your weight evenly through both feet, engage your legs without unnecessary tension, and find a neutral spine. Although it looks simple, many of the principles you’ll use in Warrior III begin here.
Chair Pose (Utkatasana)
Chair Pose strengthens the quadriceps, glutes, and deep core muscles while teaching you to stabilize the pelvis. It also develops the leg endurance needed to support your body weight on one leg.
High Lunge (Ashta Chandrasana)
High Lunge introduces the hip position you’ll use as you transition into Warrior III. It strengthens the standing leg, activates the glutes, lengthens the hip flexors of the back leg, and helps you organize your pelvis before adding the challenge of balance.
Warrior I (Virabhadrasana I)
For many practitioners, Warrior I is the most natural entry into Warrior III. It reinforces hip alignment, develops lower-body strength, and encourages you to lengthen through the spine before hinging forward.
Half Split (Ardha Hanumanasana)
Tight hamstrings are one of the most common reasons students struggle to keep a long spine in Warrior III. Half Split gently prepares the back of the standing leg without forcing flexibility, making it easier to hinge from the hips instead of rounding the back.
Tree Pose (Vrksasana)
Although Tree Pose looks very different from Warrior III, it develops one of the same essential skills: trusting your standing leg. Practicing Tree Pose beforehand helps awaken the small stabilizing muscles in the foot, ankle, and hip, making the transition into Warrior III feel more confident.
A simple sequence of Mountain Pose → Chair Pose → High Lunge → Warrior I → Warrior III works beautifully for most practitioners. Rather than trying to “achieve” Warrior III immediately, this progression gradually prepares the body and nervous system, allowing the pose to emerge with much less effort.
Counterposes for Warrior III
After challenging your balance, glutes, hamstrings, and core in Warrior III, it’s helpful to give the body a chance to release accumulated effort. Counterposes don’t need to be complicated. Their purpose is simply to restore ease, rebalance the body, and prepare you for whatever comes next in your practice.
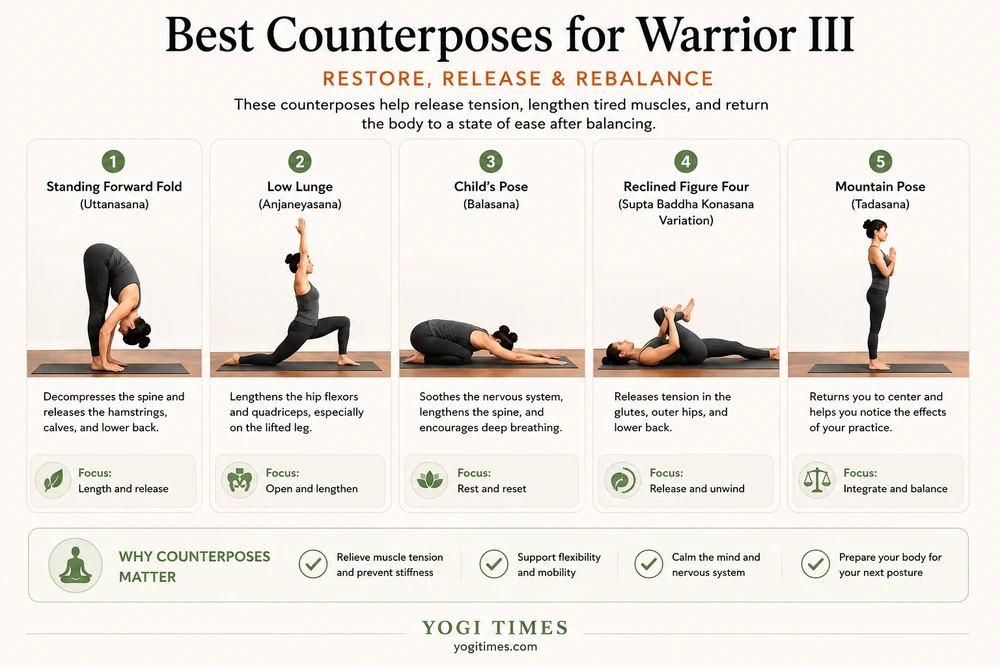
Standing Forward Fold (Uttanasana)
A gentle Forward Fold helps decompress the spine while releasing the hamstrings, calves, and lower back. Keep your knees softly bent if your hamstrings feel tight after balancing.
Low Lunge (Anjaneyasana)
Warrior III asks the hip extensors to work continuously. A Low Lunge provides the opposite action by lengthening the hip flexors and quadriceps, especially on the leg that was lifted behind you.
Child’s Pose (Balasana)
Child’s Pose offers a moment to reset both physically and mentally. It gently lengthens the spine, softens the hips, and encourages slower, deeper breathing after the concentration required in Warrior III.
Reclined Figure Four Stretch
Many practitioners notice that their standing-leg glute works surprisingly hard during Warrior III. A gentle Figure Four stretch can release tension around the outer hip without overstretching the muscles that were just working.
Mountain Pose (Tadasana)
Sometimes the best counterpose is simply standing still.
Returning to Mountain Pose allows you to notice the effects of your practice. Your feet may feel more grounded, your posture taller, and your awareness sharper than before you entered Warrior III. Taking a few quiet breaths here helps integrate the work you’ve just done before moving into the next posture.
One sequencing habit I’ve developed over the years is resisting the urge to rush into the next challenging pose. After Warrior III, I like to pause for a breath or two in Mountain Pose and simply notice the difference between my right and left sides. It’s a small practice of observation, but one that often reveals as much as the posture itself.
Yoga sequences including Warrior III
Warrior III can stand on its own, but it often feels most natural as part of a thoughtfully designed sequence. Because it combines balance, strength, and coordination, it usually appears after the body has been warmed up and before deeper stretches or seated postures.
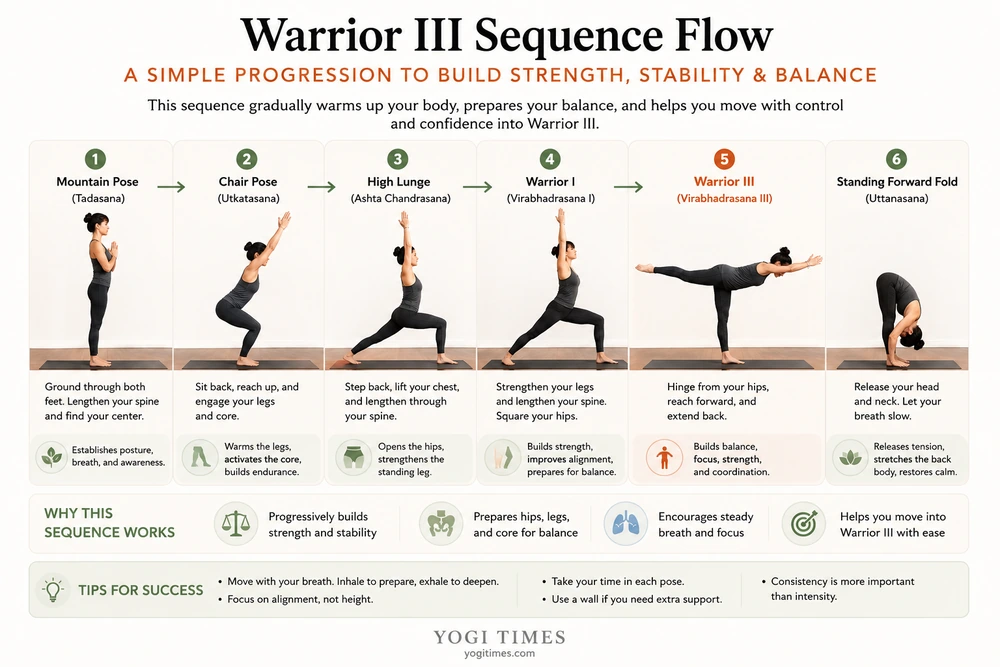
Beginner balance sequence
This sequence focuses on developing stability and confidence without rushing into advanced transitions.
- Mountain Pose (Tadasana)
- Chair Pose (Utkatasana)
- High Lunge
- Warrior I (Virabhadrasana I)
- Warrior III (Virabhadrasana III)
- Standing Forward Fold (Uttanasana)
- Mountain Pose
Take several breaths between each posture and don’t hesitate to use a wall while learning Warrior III.
Standing strength flow
Once you’re comfortable balancing, this sequence develops strength, endurance, and coordination through the legs and core.
- Warrior I
- Warrior II (Virabhadrasana II)
- Reverse Warrior
- Warrior III
- Half Moon Pose (Ardha Chandrasana)
- Standing Split
- Low Lunge
Notice how each posture prepares you for the next by gradually increasing the challenge rather than jumping straight into balance.
Power Yoga sequence
If you enjoy a stronger, more athletic practice, Warrior III fits naturally into many Power Yoga classes.
One teacher who introduced me to this style of practice was Bryan Kest in Santa Monica more than 25 years ago. His dynamic sequencing challenged not only strength and flexibility but also mental focus. Warrior III often appeared in the middle of long standing sequences, where tired legs made balance even more demanding. Looking back, those classes taught me an important lesson: balance isn’t something you have at the beginning of practice, it’s something you learn to maintain even when you’re fatigued.
If you’re interested in exploring this style further, you can read our Bryan Kest profile and our in-depth Bryan Kest Power Yoga online review, where we share our experience with his teaching approach and streaming platform.
One thing I’ve come to appreciate over the years is that Warrior III feels different depending on where it appears in a sequence. Early in practice, it reveals your balance. Later in practice, it reveals your discipline. Both are valuable teachers.
What Warrior III teaches
Every yoga pose has something to teach beyond its physical shape. For me, Warrior III has never been just about balance. It’s about learning how to respond when balance disappears.
The first time you practice the pose, you’ll probably wobble. Maybe a lot.
That’s normal.
What matters isn’t avoiding the wobble. It’s noticing what you do next.
Some people tense their shoulders. Others stop breathing. Many immediately become frustrated and try harder. I’ve done all of those things myself over the years.
Interestingly, forcing the pose almost never improves it.
The students who progress the fastest aren’t usually the strongest or the most flexible. They’re the ones who become curious. They notice that their standing foot shifted, that their hips opened, or that they stopped breathing. Then they make one small adjustment and try again.
That’s exactly how balance develops.
One of the reasons I continue returning to Warrior III after more than 30 years of practice is that it reminds me balance is never permanent. Even experienced practitioners make constant micro-adjustments. The difference is that they no longer interpret every wobble as failure.
Life works much the same way.
We rarely stay perfectly balanced for long. Relationships change. Work changes. Our bodies change. Injuries happen. Priorities evolve. What keeps us steady isn’t eliminating change, it’s learning how to respond to it with awareness rather than resistance.
Perhaps that’s the quiet lesson hidden inside Warrior III.
Balance isn’t something we achieve once.
It’s something we continuously create.
And every time we step onto the mat, we get another opportunity to practice.
Related yoga poses
Warrior III doesn’t exist in isolation. It belongs to a family of standing postures that gradually develop strength, stability, mobility, and body awareness. Exploring these related poses will help you better understand how balance evolves throughout a yoga practice.
Warrior I (Virabhadrasana I)
Warrior I is often the foundation for Warrior III. It develops lower-body strength, introduces the hip alignment used in the transition, and teaches how to generate power from the legs while maintaining an upright spine.
→ Read our complete guide to Warrior I (Virabhadrasana I).
Warrior II (Virabhadrasana II)
While Warrior II doesn’t involve balancing on one leg, it builds endurance through the legs and teaches stability through the pelvis, two qualities that transfer directly to Warrior III.
→ Explore our Warrior II pose guide.
Half Moon Pose (Ardha Chandrasana)
Half Moon is often considered the natural progression from Warrior III. Both poses require balance on one leg, but Half Moon introduces an open pelvis and a different relationship with gravity, making it an excellent next step once you’re comfortable in Warrior III.
→ Learn how to practice Half Moon Pose safely.
Tree Pose (Vrksasana)
If you’re still developing your balance, Tree Pose is one of the best places to begin. It strengthens the standing foot and ankle while teaching many of the same principles you’ll use later in Warrior III.
→ Discover the benefits of Tree Pose.
Editor’s note: This guide is based on more than 30 years of personal yoga practice, decades of observing students in class, and extensive editorial research by the YOGI TIMES team. As with any yoga posture, practice within your current abilities and seek guidance from a qualified teacher if you’re unsure about alignment or modifications.
Standing balance poses
If you’d like to continue building confidence on one leg, explore our collection of standing balance yoga poses, where you’ll find progressions, modifications, and detailed alignment guides for practitioners of every level.
As your practice develops, you’ll notice that these poses aren’t simply isolated exercises. They build upon one another. Each posture teaches a slightly different relationship between the feet, hips, spine, and breath. Over time, that understanding carries into every standing pose you practice.
Editor’s note: This guide is based on more than 30 years of personal yoga practice, decades of observing students in class, and extensive editorial research by the YOGI TIMES team. As with any yoga posture, practice within your current abilities and seek guidance from a qualified teacher if you’re unsure about alignment or modifications.
Frequently asked questions
Is Warrior III suitable for beginners?
Yes. Although Warrior III is generally considered an intermediate pose, beginners can practice it using a wall, chair, yoga blocks, or by keeping the back toes lightly on the floor. Focus on stability and good alignment before attempting the full expression.
Why do I keep losing my balance in Warrior III?
Most people lose balance because they lift the back leg too high, open the hips, or shift too far forward. Build the pose from a stable standing foot, keep the hips level, and lower the lifted leg if needed.
Should my hips stay square in Warrior III?
Yes. In the traditional version of Warrior III, both hip bones stay as level as possible and face the floor. If keeping the hips level means lowering the back leg slightly, that is usually the better choice.
Which muscles work the hardest in Warrior III?
The standing-leg glutes, hamstrings, quadriceps, calves, and ankle stabilizers do much of the work. The deep core muscles and spinal extensors support the torso, while the lifted leg stays active through the glutes and hamstrings.
Why does my standing foot cramp?
Foot cramping often happens when you grip the mat with your toes. Try spreading your toes gently and pressing evenly through the heel, the base of the big toe, and the base of the little toe.
Should I lock my standing knee?
No. Hyperextending the standing knee can place unnecessary stress on the joint and make balance harder. Keep a slight micro-bend so the surrounding muscles can support the knee.
How long should I hold Warrior III?
For most practitioners, 3 to 5 slow breaths is enough. As your balance and endurance improve, you can increase the hold to 8 to 10 breaths, as long as your breathing stays smooth.
Is Warrior III good for runners and athletes?
Yes. Warrior III develops single-leg stability, hip strength, coordination, and body awareness, which can support runners, hikers, skiers, surfers, cyclists, and other athletes.
Can I practice Warrior III if I have lower back pain?
It depends on the cause of your back pain. If the pose increases symptoms, lower the lifted leg, use props, or work with an experienced yoga teacher or healthcare professional. A long spine and steady core support are essential.
What is the difference between Warrior III and Half Moon Pose?
In Warrior III, the hips stay square to the floor. In Half Moon Pose, the pelvis opens to the side. Warrior III emphasizes forward-reaching stability, while Half Moon challenges lateral balance and rotation.
Final thoughts
Warrior III has a way of humbling almost everyone who practices it. It doesn’t matter how flexible you are, how strong you are, or how long you’ve been doing yoga. Some days you’ll feel steady and effortless. Other days you’ll wobble after a single breath.
I’ve come to appreciate that those different experiences aren’t signs of progress or failure, they’re simply reflections of where you are on that particular day.
After more than three decades of yoga practice, I’ve stopped thinking of Warrior III as a balance pose. I see it as a listening pose.
When practicing this pose, ask yourself.:
How am I standing today?
Am I rushing?
Am I forcing?
Am I breathing?
The answers often tell me much more than whether my lifted leg reached parallel to the floor.
If there’s one lesson I’d encourage you to take from Warrior III, it’s this: don’t chase the perfect shape. Build a stable foundation, move with patience, and allow the pose to evolve over time. Balance isn’t something we finally master one day. It’s a lifelong practice of paying attention, making small adjustments, and beginning again each time we lose it.
That’s what keeps me coming back to Warrior III, and to yoga itself.
Continue your Warrior III journey
If you enjoyed learning about Warrior III, you may also like exploring the poses that naturally build upon it, including Warrior I, Warrior II, Tree Pose, and Half Moon Pose, all available in our growing YOGI TIMES Yoga Pose Directory.
Interested in experiencing Warrior III within a dynamic Power Yoga practice? You can also read our in-depth Bryan Kest review and our review of Bryan Kest’s online yoga classes, where I share my personal experience after first discovering Power Yoga with Bryan in Santa Monica more than 25 years ago.
If you’re considering taking your practice even further, explore our carefully researched guide to the best online yoga teacher trainings, where we compare some of the most respected programs available today to help you find the one that best fits your goals.
Balance and strength poses like this one often become a teacher’s calling card. If Warrior III is yours, bring your teaching to the YOGI TIMES audience through Pose for a Cause.
FAQs
A soft gaze at a fixed point on the floor a few feet ahead is usually most stable. Looking too far up or down tends to disrupt balance.
Yes, wobbling is information about how your body is finding balance, not a sign of failure. It tends to settle with consistent practice.
Comfort with Warrior I and standing balance poses like Tree Pose gives you the strength and stability foundation Warrior III builds on.
References
- American College of Sports Medicine. ACSM’s Guidelines for Exercise Testing and Prescription. 11th Edition.
- Sherrington C, Fairhall N, Wallbank G, et al. Exercise for preventing falls in older people living in the community. Cochrane Database of Systematic Reviews. 2019.
- American Academy of Orthopaedic Surgeons. Balance exercises for healthy aging.
- Long R. The Key Poses of Yoga. Bandha Yoga Publications.
- Iyengar BKS. Light on Yoga. HarperCollins.
Free Wellness E-Book
Find Your Zen!
Your Free Guide
To Wellness
Download Your Free Guide & Receive Weekly Inspirations From The Lifestyle Of a Modern Yogi!