Extended Side Angle Pose (Utthita Parsvakonasana): How to align, modify and practice

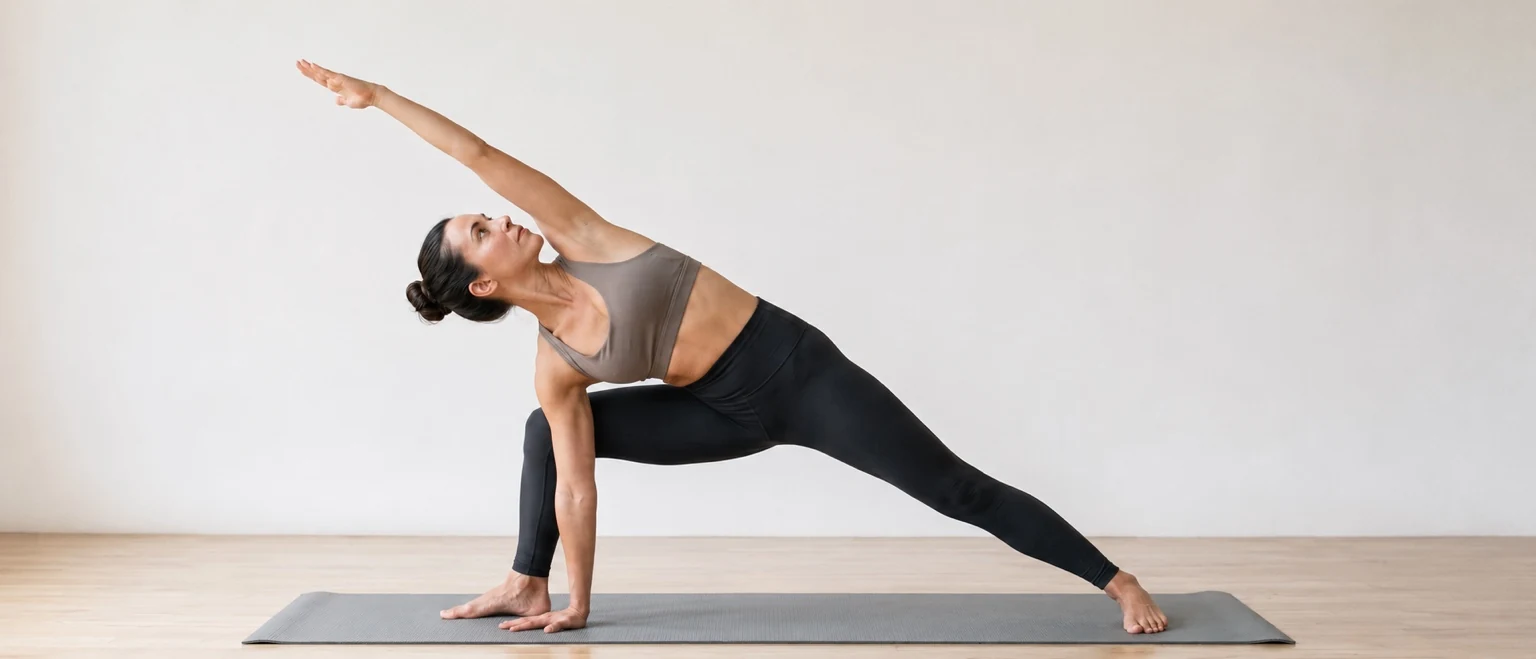
Extended Side Angle Pose can look deceptively simple: bend the front knee, reach one hand down and stretch the other arm overhead. But Utthita Parsvakonasana is less about how close your hand gets to the floor and more about what happens to the rest of your body as you reach.
Built from the strong foundation of Warrior II, the pose asks your legs to stay active while your torso lengthens sideways, creating a continuous sense of extension from the outer edge of the back foot through the upper fingertips.
If reaching lower makes your chest turn toward the floor or your weight collapse into your bottom arm, you have probably gone farther than the pose needs. A forearm on the thigh or a hand on a block can often create a more integrated Extended Side Angle than forcing the classical shape.
Quick answer
Extended Side Angle Pose (Utthita Parsvakonasana) is a standing yoga pose that combines a bent front knee and strong back leg with lateral extension through the torso. It is commonly entered from Warrior II. The priority is not getting your lower hand to the floor. Keep the legs active, the front knee stable and the side body long. If reaching down causes your chest to collapse or your lower arm to carry your weight, place your forearm on your thigh or your hand on a block and build the pose from there.
Think of the pose in three parts: ground, stabilize, lengthen
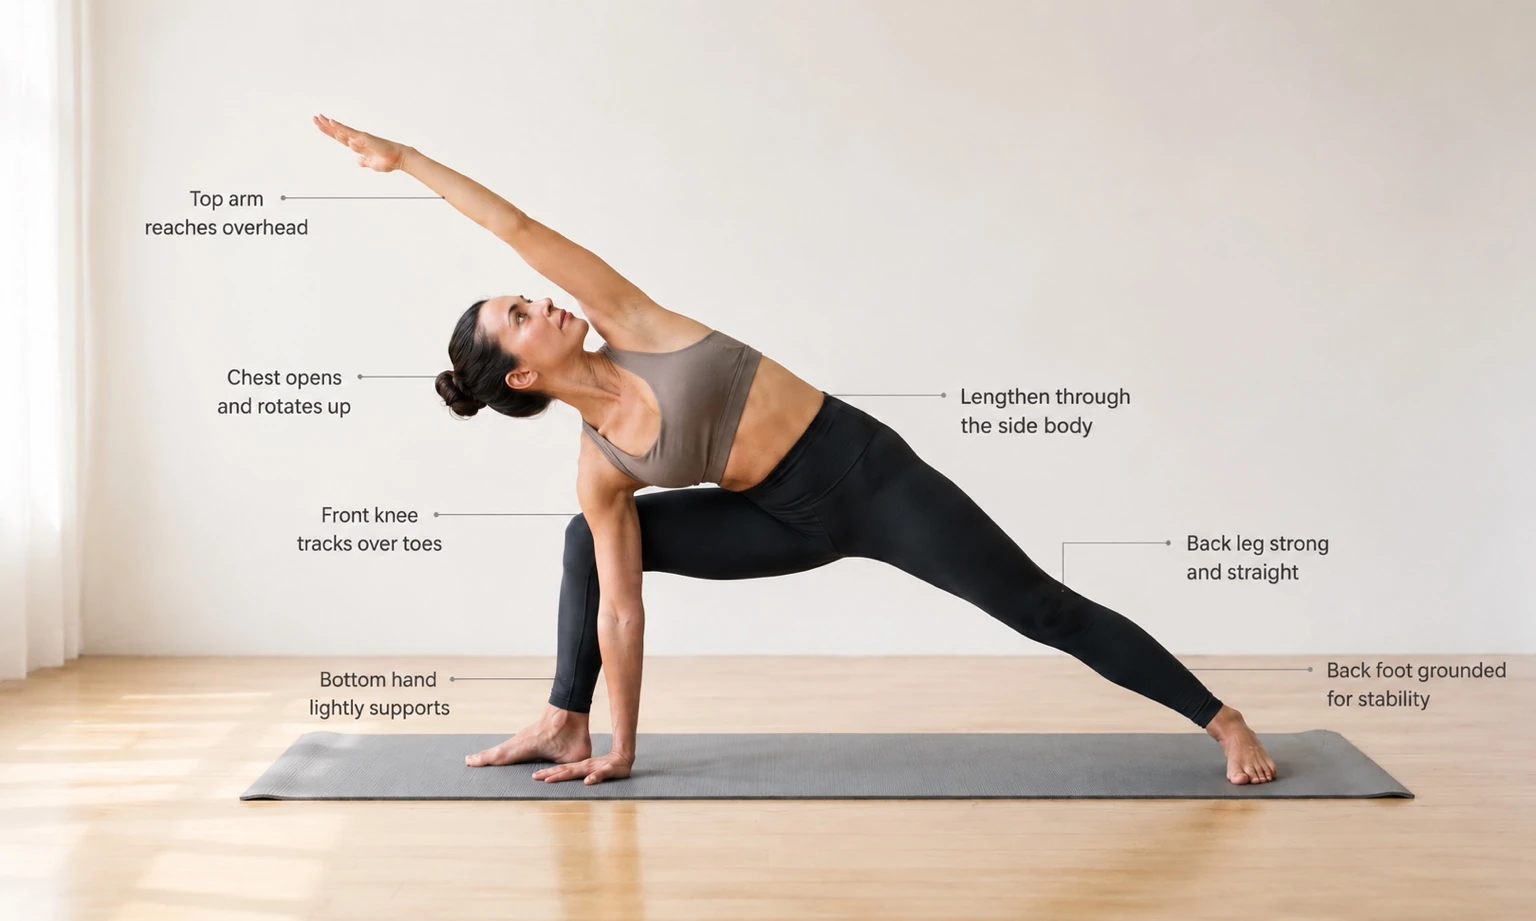
Extended Side Angle becomes easier to understand when you stop thinking of it as a shape you have to reproduce and instead feel how the pose is built from the ground upward.
1. Ground
Start with your feet. The front foot provides a stable base beneath the bent knee, while the back foot keeps you connected to the floor behind you. Rather than letting all your weight travel into the front leg, maintain a sense of pressure and activity through both feet.
That back-foot connection matters. When it disappears, the pose can start to feel like a forward lunge with the torso tipped sideways rather than a standing pose supported from both ends.
2. Stabilize
From that foundation, organize the legs and pelvis. The front knee bends while the back leg remains active. Your trunk supports the position rather than asking the lower hand or forearm to hold you up.
This is where many people lose the architecture of the pose. As the hand reaches lower, more weight begins to fall into it. Instead, choose a hand position that allows your legs and trunk to keep doing their share of the work.
3. Lengthen
Only then think about reaching.
The upper side of the torso extends from the back foot through the side waist, ribs and upper arm. The aim is not simply to stretch the top arm as far as possible. Look for space through both sides of the waist, rather than shortening the underside of the torso in order to create a more dramatic shape.
This creates the characteristic diagonal of Utthita Parsvakonasana without sacrificing the foundation underneath it.
A useful way to remember the sequence: ground first, stabilize second, lengthen third.
How to do Extended Side Angle Pose step by step
Starting from Warrior II gives you most of the foundation you need for Extended Side Angle Pose. Set the legs first, then allow the torso and arms to develop from that stable base.
- Begin in Warrior II. With your right foot forward, bend your right knee and extend your left leg behind you. Turn the back foot in slightly and keep the sole grounded.
- Check your front knee. Let the knee point in the same general direction as the toes rather than dropping toward the inside of the foot. Adjust the length of your stance if you need more stability.
- Keep the back leg active. Press through the back foot and maintain tone through the leg instead of allowing most of your weight to shift forward.
- Lengthen before you lower. Reach your right arm forward over the bent leg. This small action creates space along the right side of your waist before the torso begins to angle.
- Choose your lower-arm position. Rest your right forearm lightly on your right thigh, place your right hand on a block, or bring the fingertips or palm toward the floor if you can do so without collapsing the torso.
- Open the chest gradually. Rotate your chest away from the floor while keeping the lower side of your waist long. Avoid using the bottom arm to push yourself into a deeper rotation.
- Extend the top arm. Reach your left arm alongside your ear, with the palm generally facing down, creating a long diagonal from the back foot through the side body to the fingertips. If this feels restrictive in the shoulder, keep the arm reaching upward instead.
- Choose a comfortable gaze. Look forward, sideways or toward the upper hand depending on what allows your neck to remain comfortable. Looking upward is an option, not a requirement.
- Breathe without sacrificing the foundation. Stay for several steady breaths while maintaining activity through both legs and space through the torso.
How to come out of the pose
Press firmly through both feet and use the strength of your legs and trunk to bring your torso upright. Return to Warrior II, straighten the front leg, then repeat on the other side.
Before trying to go lower, ask one question: can I still feel my back foot, my legs and the length through my side body? If the answer is no, come slightly higher. The more useful version of the pose is the one you can support, not necessarily the one closest to the floor.
How low should your bottom hand go?
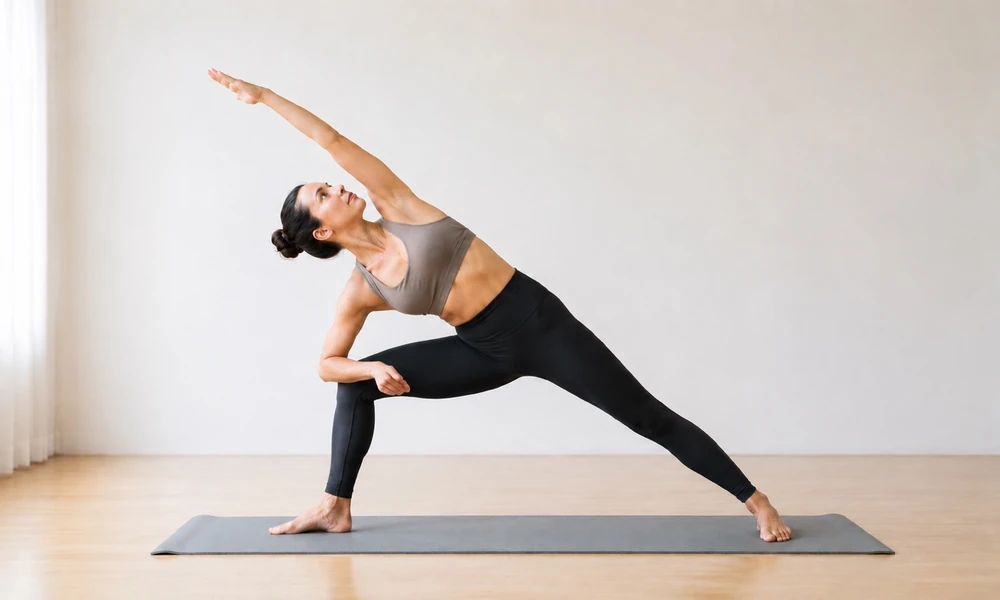
Your bottom hand does not need to touch the floor for Extended Side Angle Pose to be effective.
In fact, reaching for the floor too early can change the pose in ways you may not want: the chest turns downward, the lower side of the waist compresses, the front arm starts supporting your body weight, or the back leg loses some of its activity.
A better question than “Can I reach the floor?” is:
“How low can I go while keeping the rest of the pose organized?”
For one person, that may mean a hand on the floor. For another, a block or forearm on the thigh may create more space and stability.
Forearm on the thigh
Resting your forearm lightly on the front thigh is a useful way to learn the direction of the pose without making flexibility the deciding factor.
Keep some lift through the underside of your torso rather than sinking your weight into the thigh. Continue pressing through both feet and let the upper side of the body lengthen away from the back foot.
If you can breathe comfortably and feel your legs supporting you, you are already practicing the essential actions of Extended Side Angle.
Hand on a block
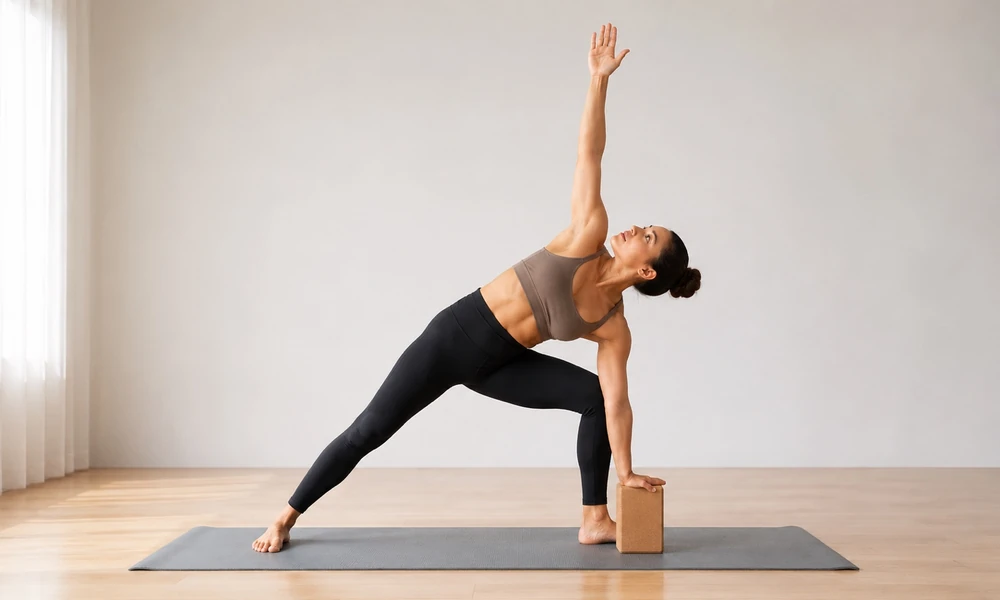
A block bridges the space between your hand and the floor while allowing you to keep the front knee bent and the chest more open.
Place the block near the front foot at a height that lets you reach it without shortening the lower side of your torso. There is no prize for using the lowest setting. The useful block height is the one that helps you maintain the architecture of the pose.
You may find that a higher block actually makes the pose feel stronger because your legs and trunk remain responsible for supporting you instead of transferring that job into your hand.
Hand toward the floor
If you can bring your hand toward the floor while maintaining the activity of the back leg, stability of the front knee and length through both sides of the waist, explore that version gradually.
The hand may come to the inside or outside of the front foot depending on the variation, your proportions and the amount of space available in your stance.
Once the hand reaches the floor, notice whether you begin leaning heavily into it. Ideally, it remains part of the foundation without becoming a crutch for the rest of the pose.
These are variations, not levels of achievement
It is tempting to see the progression as:
forearm → block → floor = beginner → intermediate → advanced
Bodies do not work quite that neatly.
Arm length, leg length, hip mobility, stance width, strength, injury history and individual proportions all influence where the lower hand comfortably lands. Two experienced practitioners may therefore practice different versions of Utthita Parsvakonasana for good reasons.
The goal is not to make your pose look like somebody else’s.
Choose the version that lets you keep the qualities of the pose: a grounded base, an active lower body and space through the side body.
Teacher Insight
When someone reaches lower and suddenly loses the back leg, shortens the lower waist or turns the chest toward the floor, going deeper has not necessarily improved the pose.
Often the most useful adjustment is surprisingly simple: bring the floor closer.
A block can give you enough height to reorganize the legs and torso. Once that support is there, the pose often feels more spacious rather than less challenging.
Alignment: five places to check
Extended Side Angle involves several actions at once, which is why trying to perfect everything simultaneously can make the pose feel unnecessarily complicated. Instead, check it from the ground upward.
These five areas will tell you more about your pose than whether your fingertips reach the floor.
1. Front knee: keep the foundation steady
As you bend the front knee, let it travel in the same general direction as the toes rather than collapsing inward.
You do not need to force the thigh perfectly parallel to the floor. The depth of the bend depends on your strength, mobility, stance and comfort. If the knee feels unstable, shorten the stance or come slightly higher and rebuild from there.
Also notice where the pressure is moving through your front foot. Rather than rolling strongly toward the inner edge, keep the heel and both sides of the forefoot connected to the mat.
A deeper bend is useful only while you can control it.
2. Back foot and leg: don’t let the pose become entirely about the front side
The back leg can quietly disappear from Extended Side Angle.
Keep the back foot grounded and the leg active. Think less about rigidly locking the knee and more about maintaining a clear line of support through the leg into the foot.
This creates opposition: the lower body grounds in two directions while the torso reaches away from it.
If almost all your weight has shifted into the front leg and bottom hand, return some attention to the back foot. That small adjustment can change the feeling of the entire pose.
3. Pelvis: allow organization without forcing symmetry
Extended Side Angle does not require you to aggressively turn the pelvis toward the ceiling.
The pelvis follows the architecture established in Warrior II, while the torso gradually rotates more open. How far that rotation appears will vary with hip structure, mobility, stance and individual proportions.
Forcing the pelvis to match an idealized photograph can simply move the strain somewhere else.
Instead, look for a position where the front knee remains stable, the back leg stays active and you can rotate the torso without losing the base underneath you.
4. Side waist and ribs: create length on both sides
The dramatic line of the pose appears along the upper side of the body, but pay just as much attention to the side closest to the floor.
If the lower ribs drop heavily toward the front thigh, the underside of the waist can become compressed. Lift gently away from the thigh or lower hand and create a little more space there.
Then let the upper ribs and arm extend in the opposite direction.
Think of lengthening the torso before rotating it. You may find that the chest opens more naturally when you stop trying to twist it into position.
5. Chest, shoulder and gaze: open only as far as you can stay comfortable
Allow the chest to rotate away from the floor without forcing the top shoulder backward.
Your upper arm can reach alongside the ear to continue the diagonal line of the pose, but it does not have to. If reaching overhead creates pinching, restriction or makes the ribs flare dramatically, reach the arm upward or place the hand on your hip while you work with the torso.
The same principle applies to your gaze.
Looking toward the upper hand is a familiar expression of Utthita Parsvakonasana, not a requirement. If turning your head upward creates tension in your neck or disrupts your balance, look sideways or toward the floor.
A quick alignment check
Before trying to deepen the pose, notice:
Can I feel both feet? Is my front knee steady? Can I breathe without hanging on my lower arm? Is there space through my waist? Is my neck comfortable?
If those answers are mostly yes, the pose is doing its work.
If one disappears as you reach lower, that is useful information rather than a failure. Adjust the stance, raise the hand, change the arm position or alter the gaze until the pose feels supported again.
Why you may be collapsing into the front arm
One of the easiest ways to lose the character of Extended Side Angle is to let the lower arm become the main support for the pose.
It often happens gradually. You bend the front knee, lower the torso, reach toward the floor and, without really noticing, begin leaning into the forearm or hand. The pose may look deeper, but the legs and trunk are doing less of the work.
The lower arm can provide contact and feedback, but it does not need to hold you up.
Notice where your weight has gone
If you are practicing with your forearm on your thigh, notice whether you could make that contact a little lighter without changing the rest of the pose.
If your hand is on a block or the floor, ask the same question: could I reduce the pressure through this hand and still maintain the shape?
You do not need to lift the hand completely. The question simply reveals where you are finding support.
If lightening the hand causes the torso to collapse immediately, come higher and reconnect with your feet and legs.
Rebuild the pose from below
Rather than trying to lift your torso with the bottom arm, press into both feet and re-engage the legs.
Keep the front knee steady. Reconnect with the back foot. Then create a subtle sense of lift through the underside of the waist before reaching the upper arm away.
This often makes the pose feel surprisingly different. Instead of hanging downward, you begin to feel the body extending in two directions: grounding through the legs while lengthening through the torso.
Sometimes the simplest solution is to raise the hand
If you repeatedly collapse into your lower shoulder or shorten the lower side of your waist, the problem may not need another alignment cue.
Your hand may simply be too low.
Move it to a higher block, or return your forearm to your thigh. Once the torso has enough space, you can work on the actions of the pose without fighting the distance between your hand and the floor.
This is why props are not merely beginner tools. A block can change what you are able to learn from the pose.
Use sensation as information, not as a test
Extended Side Angle involves muscular effort, particularly through the legs and trunk, but effort and strain are not the same thing.
If you feel yourself holding your breath, gripping through the shoulder, losing stability in the front knee or hanging heavily into the lower arm, you have useful information. Rather than pushing through it, change something.
Come slightly higher. Shorten the stance. Use a block. Change the position of the upper arm.
The aim is not to make the pose effortless. It is to put the effort where it belongs.
A useful self-check: If someone could quietly slide the block away from under your hand, would your legs and trunk still be participating in the pose?
You do not need to actually remove the support. Simply imagining it can reveal whether the prop is helping you organize the pose or whether you are resting your weight on it.
What does Extended Side Angle Pose work?
Extended Side Angle is both a strengthening and lengthening pose. The bent front leg supports much of the muscular effort, the back leg keeps the stance anchored, and the trunk helps maintain the position as the torso extends sideways.
This combination is what makes Utthita Parsvakonasana interesting: you are not simply stretching one area. You are asking different parts of the body to stabilize, support and lengthen at the same time.
Legs and hips: strength beneath the stretch
The front leg works to maintain the bent-knee position, particularly through the quadriceps and muscles around the hip. The gluteal muscles contribute to controlling the hip and helping stabilize the leg.
Meanwhile, the back leg stays active to prevent the pose from drifting entirely forward.
Depending on your stance and individual anatomy, you may also feel length through the inner thighs and groin. The sensation should not need to be intense to be useful. A stance that allows you to stay stable and breathe freely is usually more productive than widening the feet simply to create a stronger stretch.
Core and torso: supporting the side bend
Your trunk is doing more than may be obvious from the outside.
The abdominal and spinal muscles help support the torso as it moves away from an upright position. The obliques and other muscles around the trunk contribute to controlling the lateral position and rotation rather than allowing gravity to pull the torso toward the floor.
This is one reason Extended Side Angle can feel considerably more demanding when you stop leaning heavily into the lower arm.
Side body: length without becoming passive
The overhead arm creates the most recognizable line of Utthita Parsvakonasana, extending from the back foot through the side of the torso toward the fingertips.
You may feel length through the outer hip, waist, ribs and the area around the shoulder and upper arm. But rather than trying to create the strongest possible stretch, think about making space while maintaining support underneath it.
That distinction matters. The side body is lengthening, but the pose itself remains active.
Shoulders and upper body
Reaching the upper arm alongside the ear adds shoulder movement to the pose. For some bodies this feels spacious; for others it may feel restricted.
The arm does not have to reach overhead for you to receive the main benefits of Extended Side Angle. You can reach it toward the ceiling or keep the hand on your hip while maintaining the work through the legs and torso.
The position should adapt to the shoulder rather than asking the shoulder to conform to a photograph.
Balance, coordination and endurance
Although Extended Side Angle is not usually classified primarily as a balancing pose, maintaining a wide stance while coordinating the feet, knees, pelvis, torso, arms and gaze requires body awareness and control.
Holding the pose for several comfortable breaths also asks the legs to sustain effort rather than produce it for only a moment.
Over time, practicing this kind of standing pose can help develop the ability to coordinate stability in one part of the body with movement in another.
What about flexibility?
Extended Side Angle can involve mobility through the hips, inner thighs, side body and shoulders, but greater flexibility is not necessarily the goal.
If increased range causes you to lose control of the front knee, back leg or trunk, more range has not automatically created a more useful pose.
A more practical measure of progress is whether you can move into the position with greater control, steadier breathing and less unnecessary effort.
That may eventually allow your hand to move lower. Or it may simply make the version you already practice feel more integrated.
Common Extended Side Angle mistakes and how to adjust them
Most problems in Extended Side Angle do not come from failing to reproduce the “perfect” shape. They happen when one part of the pose is asked to compensate for another.
Rather than correcting everything at once, notice what has changed and make the smallest adjustment that restores stability, space or comfort.
1. The front knee falls inward
As the front knee bends more deeply, it may begin drifting toward the inside of the foot.
Try this: come slightly higher, shorten your stance if needed and reestablish contact through the front foot. Let the knee travel in the same general direction as the toes without forcing it into a rigid position.
Once the leg feels steady, decide whether a deeper bend still makes sense.
2. Your chest turns toward the floor
This often happens because the lower hand is reaching farther down than the torso can comfortably accommodate.
Instead of trying to twist the chest upward from that compressed position, raise the floor to meet you.
Place your hand on a block, use a higher block setting or return your forearm to your thigh. Then lengthen the torso before gradually allowing the chest to rotate.
Sometimes gaining height creates more openness than trying to go deeper.
3. The back foot becomes light
When attention moves entirely toward the bent front leg and reaching arm, the back leg can become passive.
You may notice the back foot losing pressure against the mat or your body weight moving almost completely forward.
Try this: reconnect with the back foot before changing anything in the upper body. Feel the leg supporting the pose behind you while the front leg supports it ahead of you.
That opposition is part of what creates the long diagonal characteristic of Extended Side Angle.
4. You are hanging on the bottom arm
Whether your forearm is on your thigh or your hand is on a block, it is easy to gradually transfer more and more body weight into that contact point.
Rather than removing the support, make it lighter.
Press through the feet, reactivate the legs and create a subtle lift through the lower side of the waist.
The prop or arm can support the pose without becoming the pose’s foundation.
5. The neck is working harder than the rest of you
Looking toward the upper hand is commonly shown in photographs of Utthita Parsvakonasana, but it is only one gaze option.
If turning your head upward creates compression, dizziness, tension or makes you less stable, change the gaze.
Look straight ahead, sideways or down toward the mat.
Your neck does not need to prove anything for the pose to be complete.
6. The upper shoulder feels pinched
Reaching the top arm alongside the ear creates the familiar long line of Extended Side Angle, but shoulder mobility varies considerably.
If the overhead position feels compressed, reach the arm vertically instead. You can also place the top hand on your hip and focus on opening the torso without involving the arm.
Once the shoulder feels spacious, explore reaching overhead again if you wish.
7. You keep trying to make the pose bigger
A wider stance, deeper knee bend, lower hand and stronger rotation can all make Extended Side Angle look more dramatic.
They do not automatically make it better.
If increasing one part of the shape causes you to lose another essential action, reduce the range until the pose feels connected again.
This is particularly useful when practicing without a teacher nearby: change one variable at a time. Raise the hand. Shorten the stance. Soften the depth of the knee bend. Change the gaze.
Then notice what changed.
A simple troubleshooting order
When Extended Side Angle does not feel right, work upward:
Feet → front knee → legs → pelvis → torso → shoulders → neck.
Starting with the upper arm or gaze while the foundation is unstable often means correcting the symptom rather than the source.
And if you feel sharp pain, joint pain or a sensation that feels distinctly different from normal muscular effort, come out of the pose rather than trying to “fix” it while holding the position.
Beginner modifications that still teach the real pose
A modification should not simply make Extended Side Angle easier. Ideally, it should help you understand the actions you will eventually use in any version of the pose.
For beginners, that means finding enough support to keep the feet grounded, legs active and torso long while learning how to coordinate the different parts of Utthita Parsvakonasana.
Rest your forearm lightly on your thigh
From Warrior II, bring your front forearm onto the thigh instead of reaching toward the floor.
This removes the challenge of reaching down and gives you more freedom to explore what is happening through the torso.
Keep the contact light rather than sinking into the thigh. Press through both feet, maintain the front knee position and reach the upper arm overhead or toward the ceiling.
This is not a lesser version of Extended Side Angle. It can be one of the clearest ways to learn its basic organization.
Bring the floor closer with a block
Place a block beside the front foot and bring your lower hand to it.
Start with the block higher than you think you need. If your legs remain active and you can maintain length through the torso, experiment with a lower setting.
If lowering the block makes your chest collapse or causes you to lean heavily into the hand, move it higher again.
Let the block adapt to your body, rather than changing your body to reach the block.
Reduce the depth of the front knee bend
You do not need the front thigh parallel to the floor to practice Extended Side Angle.
A shallower knee bend can make it easier to stabilize the front leg and distribute your weight between both feet. It may also give you more capacity to concentrate on the torso and arms.
As strength and familiarity develop, you can explore bending the knee further while keeping the same sense of control.
Shorten your stance
If the wide Warrior II stance makes you feel unstable, bring the feet slightly closer together.
This is a particularly useful adjustment when you find yourself struggling to keep the back foot grounded or losing control of the front leg.
There is no single stance length that works for everyone. Leg length, hip structure, mobility and experience all affect how much distance between the feet feels appropriate.
Keep the top hand on your hip
There is a lot to coordinate in Extended Side Angle. Removing the overhead arm temporarily can make the pose much easier to understand.
Place the top hand on your hip and focus on the lower body first. Then lengthen the spine and gradually rotate the chest without using the arm to pull yourself farther.
Once that feels organized, reach the arm toward the ceiling. If the shoulder remains comfortable, explore extending it alongside the ear.
Use a wall for feedback
A wall can be useful if balance or spatial awareness is making the pose difficult to organize.
Depending on how you set up, the wall can provide feedback for the back foot or help you sense the position of the torso without requiring you to guess where your body is in space.
Treat the wall as feedback rather than something to lean heavily against.
If you are new to the pose, start here
You do not need to try every modification.
A simple first version is enough:
Warrior II → forearm lightly on thigh → top arm toward the ceiling or overhead → steady breathing → return to Warrior II.
Once that feels familiar, introduce a block.
The floor can wait.
What matters is that the modification preserves the central relationship we have been building throughout this guide: ground through the feet, stabilize through the legs and trunk, then create length through the torso.
As the pose becomes more familiar, progress does not have to mean reaching lower. It may mean needing less pressure through your supporting arm, feeling more stable through the legs, breathing more comfortably, or moving into and out of the pose with greater control.
Those are meaningful changes too.
From Extended Side Angle to deeper variations
Once the foundation of Extended Side Angle feels steady, you can explore variations that ask for more mobility, strength or coordination.
There is no requirement to progress toward the most complex version. A deeper variation is useful only if you can preserve the essential actions of the pose while practicing it.
Think of these as different ways to explore Utthita Parsvakonasana rather than levels you need to complete.
Hand to the floor
From the block-supported version, you may gradually lower the block or bring your bottom hand to the mat.
The hand can come to the inside of the front foot. In some expressions of the pose, it is placed outside the front foot.
Whichever position you explore, check what happens elsewhere when the hand moves lower.
Can you still feel the back foot? Is the front knee steady? Is there space through the lower side of your waist? Can you rotate the chest without forcing it?
If reaching the floor changes several of those answers, return to the block. The floor itself adds little if you lose the organization that brought you there.
Extend the top arm alongside the ear
If you have been reaching the upper arm toward the ceiling, begin to take it overhead.
Reach through the fingertips while maintaining the connection of the back foot to the mat. Rather than simply moving the arm farther, imagine the entire upper side of your body lengthening in one continuous direction.
This is where the name Extended Side Angle becomes particularly tangible: the pose creates a long diagonal through the side body rather than an isolated stretch in the shoulder.
Keep enough space between the shoulder and neck that the reach still feels comfortable.
Bound Extended Side Angle
A common deeper variation is Bound Extended Side Angle, often called Baddha Utthita Parsvakonasana.
From Extended Side Angle, the lower arm reaches underneath the front thigh while the upper arm wraps behind the back. The hands meet, or move toward one another, behind the body.
The bind adds significant demands on shoulder mobility, hip mobility and rotation. It can also make it easier to forget what the legs are doing.
Before attempting the bind, make sure the basic pose is stable without it.
If the hands do not comfortably meet, avoid pulling the shoulders into position simply to complete the clasp. Returning to the unbound version may give you more freedom to work with the actions that matter most.
Bound does not automatically mean better
A bind changes the pose. It does not necessarily improve it.
Once the arms are connected behind the body, attention can easily shift toward achieving or maintaining the clasp. Meanwhile, the front knee may change direction, the back foot may become lighter or the torso may lose length.
If you explore the bind, periodically check the foundation underneath it.
The variation should grow out of the pose, not replace it.
What does progression actually look like?
Progress in Extended Side Angle may eventually mean reaching the floor or exploring a bind. But those are only the most visible changes.
Progress can also look like:
- distributing your weight more evenly between the feet
- maintaining a steadier front knee
- using less pressure through the lower hand
- finding more space through the waist
- breathing more comfortably while holding the pose
- transitioning into and out of it with greater control
These changes are less obvious in a photograph, but they often reveal much more about how your practice is developing.
Before moving into a deeper variation, return to the same three questions that have guided this pose from the beginning:
Am I grounded? Am I stable? Can I lengthen from there?
If so, explore.
If not, the previous variation may currently offer you more.
Extended Side Angle vs Triangle Pose: what’s the difference?
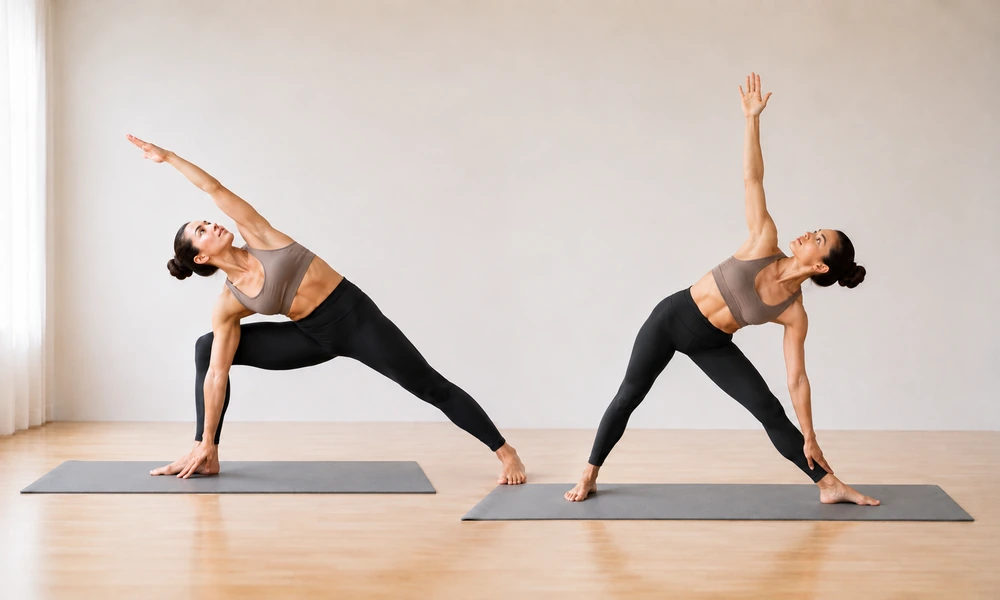
Extended Side Angle and Triangle Pose are closely related. Both use a wide standing stance, both ask the legs to create a stable foundation, and both combine lower-body work with length and rotation through the torso.
The most obvious difference is the front leg: Extended Side Angle bends the front knee, while Triangle Pose keeps the front leg straight.
But that one change affects almost everything else you experience in the pose.
The bent front knee changes the foundation
In Extended Side Angle, bending the front knee lowers your center of gravity and asks the front leg to sustain more muscular effort.
The back leg remains active, creating support from the opposite end of the stance.
Triangle Pose removes that deep knee bend. Both legs remain straight as the torso extends over the front leg, which changes how the hips, legs and torso organize the shape.
This is why the two poses can look related while feeling quite different.
The torso reaches in a different direction
In Triangle Pose, you first lengthen the torso over the straight front leg before bringing the lower hand toward the shin, block or floor. The upper arm typically reaches vertically.
Extended Side Angle creates a more continuous diagonal.
The torso moves over the bent front leg while the upper arm can extend alongside the ear, creating the characteristic line from the back foot through the side waist and into the fingertips.
Triangle emphasizes the triangular shape. Extended Side Angle emphasizes the diagonal.
Should you learn Triangle before Extended Side Angle?
Not necessarily.
Neither pose has to be treated as a prerequisite for the other. For many beginners, Extended Side Angle with the forearm resting lightly on the thigh can actually feel more accessible than reaching toward the lower leg in Triangle.
What matters more is understanding the shared foundation: grounded feet, active legs and a torso that lengthens before it tries to move farther.
Why practice both?
Practicing the poses together lets you experience how one change in the lower body reorganizes an entire posture.
Try moving from Warrior II into Extended Side Angle, return to Warrior II, straighten the front leg and then explore Triangle Pose.
Rather than asking which pose gives you the “better stretch,” notice the differences.
Where does each pose require strength? Where do you feel length? What changes when the front knee bends or straightens? Does your relationship with the back foot change?
This kind of comparison can teach you more than trying to make either pose look deeper.
Quick answer: Triangle vs Extended Side Angle
If you are trying to identify the poses at a glance:
Bent front knee + upper arm reaching overhead = usually Extended Side Angle.
Straight front leg + upper arm reaching upward = usually Triangle Pose.
There are variations of both, so these are useful visual clues rather than absolute rules.
And in practice, the two poses are less like competitors and more like close relatives. They share much of the same standing foundation while asking your body to organize that foundation in different ways.
How Extended Side Angle connects to Warrior II
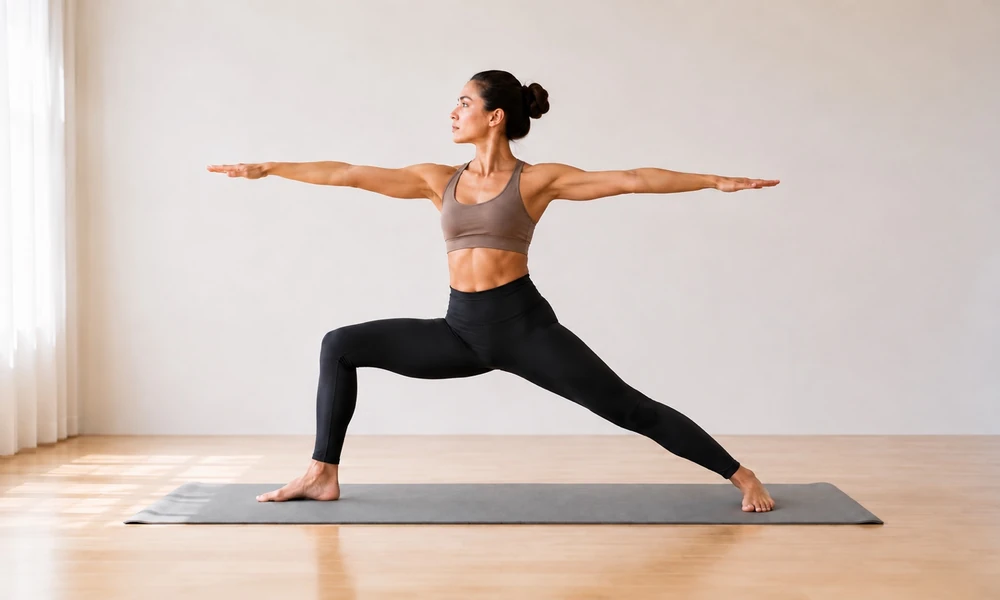
Warrior II and Extended Side Angle are natural partners because Utthita Parsvakonasana can grow directly out of the Warrior II foundation.
The feet can remain in essentially the same position, the front knee stays bent, and the back leg continues to provide support. What changes most is the relationship of the torso and arms to that foundation.
This makes Warrior II more than a convenient starting position. It can also be a useful place to check and reset your alignment before moving into Extended Side Angle.
Start with the legs, not the reach
In Warrior II, establish your stance before thinking about lowering the torso.
Feel both feet on the mat. Bend the front knee to a depth you can control and keep the back leg active. Let the pelvis and torso settle into a position where you feel stable.
From there, reach the front arm forward before bringing the forearm to the thigh or the hand toward a block or the floor.
That forward reach matters. It encourages you to create length before moving down rather than simply dropping the torso toward the front leg.
Then extend the upper arm toward the ceiling or alongside the ear to develop the diagonal line of Extended Side Angle.
Use Warrior II as a reset
If Extended Side Angle starts to feel compressed or unstable, you do not always need to correct the pose while you are inside it.
Come back to Warrior II.
Reestablish the feet. Check the front knee. Reconnect with the back leg. Take a breath.
Then enter Extended Side Angle again.
This can be more useful than stacking correction upon correction once the foundation has already been lost.
Moving between the two poses
A simple transition looks like this:
Warrior II → reach forward → Extended Side Angle → return to Warrior II
Moving slowly between the two lets you notice what stays constant and what changes.
The legs continue to create the base while the torso moves from upright to diagonal and back again. With practice, the transition can become less about arranging individual body parts and more about maintaining support while your relationship to gravity changes.
That is a useful skill beyond these two poses.
A natural standing-pose relationship
Warrior II can also connect Extended Side Angle to other standing poses in a sequence.
For example:
Warrior II → Extended Side Angle → Warrior II → Triangle Pose
The front knee bends for the first two poses and straightens before Triangle. Because the stance shares several characteristics, you can explore how relatively small changes in the legs reorganize the torso and the experience of the pose.
Rather than rushing through those transitions, use them as part of the practice.
Notice whether you lose the back foot when you move forward. Notice whether the front knee changes direction as the torso lowers. Notice whether you can return to Warrior II without pushing off heavily from your bottom hand.
The transition tells you something the final pose cannot: whether you can maintain the foundation while you move.
That is one reason Warrior II is such a useful companion to Extended Side Angle. It gives you somewhere stable to begin, somewhere familiar to return to, and a clear reference point for understanding what Utthita Parsvakonasana adds.
How to sequence Extended Side Angle Pose
Extended Side Angle fits naturally into a standing sequence because it builds on movements you may already be exploring in Warrior poses.
Rather than treating Utthita Parsvakonasana as an isolated shape, it can be useful to think about what prepares the body for it, how you enter it, and where you want the practice to go afterward.
What to practice before Extended Side Angle
You do not need an elaborate warm-up specifically for Extended Side Angle, but moving the hips, legs, shoulders and spine before holding a wide standing pose can make the transition feel more natural.
Depending on the practice, useful preparation might include:
- Mountain Pose to establish standing awareness
- a few rounds of Cat-Cow or another gentle spinal movement
- Downward-Facing Dog
- Low or High Lunge
- Warrior I
- Warrior II
Warrior II is particularly useful because it establishes much of the same lower-body foundation.
If you are practicing Extended Side Angle early in your session, begin with a more moderate stance and knee bend. You can always explore greater range once the body feels ready for it.
A simple sequence into Extended Side Angle
For a straightforward standing progression, try:
Mountain Pose → High Lunge → Warrior II → Extended Side Angle
Stay for several comfortable breaths, then return to Warrior II before transitioning elsewhere.
This gives you a chance to establish the legs before adding the lateral movement of the torso.
Pair it with Triangle Pose
Extended Side Angle and Triangle Pose work particularly well together because you can explore similar foot placement with two different front-leg actions.
For example:
Warrior II → Extended Side Angle → Warrior II → straighten the front leg → Triangle Pose
The value of this transition is not simply efficiency.
It lets you notice what changes when the front knee moves from bent to straight. The relationship between the legs, pelvis and torso shifts, even though the poses share a recognizable standing foundation.
What can come after Extended Side Angle?
There is no single pose that must follow it.
You might return to Warrior II and continue through another standing posture, transition through a vinyasa, or step forward and give the legs a moment in a more neutral position.
Possible directions include:
Extended Side Angle → Warrior II → Triangle Pose
or
Extended Side Angle → Warrior II → Reverse Warrior
or, in a flowing practice:
Extended Side Angle → hands to mat → Downward-Facing Dog
The best transition depends on the purpose and pace of the sequence.
Practice both sides
Because Extended Side Angle is asymmetrical, practice it on both sides when appropriate.
That does not mean the two sides need to look identical.
You may notice that one hip feels more mobile, one leg feels stronger, or one direction of rotation feels more familiar. Instead of immediately trying to make the second side match the first, notice the difference before deciding whether anything needs to change.
Your stance, block height or depth of knee bend can be adjusted from one side to the other when that creates a more stable and comfortable pose.
If you are learning the pose, keep the sequence simple
It can be tempting to add many standing poses once you know how they connect. But if your goal is to understand Extended Side Angle, fewer transitions may teach you more.
Try repeating:
Warrior II → Extended Side Angle → Warrior II
Move slowly several times before holding the pose.
Notice what happens to the back foot as you lower. Notice whether the front knee remains steady. Notice whether you reach down first or lengthen forward first.
Then hold your chosen version for a few breaths.
Learning the transition can be as valuable as holding the final shape.
Over time, Extended Side Angle can become part of a longer standing sequence. But the same principle remains: establish the ground, stabilize the pose, and then create length.
Safety and when to modify Extended Side Angle
Extended Side Angle can be adapted considerably, which is useful because the classical shape asks several areas of the body to work at the same time.
You do not need to wait until something hurts before modifying the pose. A modification can simply be the version that allows you to stay stable, breathe comfortably and maintain control.
If your front knee feels uncomfortable
Reduce the depth of the knee bend and check your stance.
Make sure the knee is moving in the same general direction as the toes rather than falling inward. You can also shorten the stance if the wider position makes the leg difficult to control.
If discomfort persists, come out of the pose rather than repeatedly adjusting around pain.
If your neck feels strained
Looking toward the upper hand is optional.
Keep your gaze forward or toward the floor if that feels more comfortable. You can still practice the primary actions of Extended Side Angle without rotating your head upward.
This is especially worth remembering because photographs often show the upward gaze as though it were an essential part of the pose. It isn’t.
If the overhead arm bothers your shoulder
Reach the upper arm toward the ceiling instead of alongside your ear, or place the hand on your hip.
You can continue working with the legs and torso without forcing the shoulder into a range that feels restricted.
If you experience sharp or persistent shoulder pain, stop that arm position rather than trying to stretch through it.
If balance feels uncertain
Come higher in the pose, shorten your stance or use a wall for additional feedback and support.
You can also keep your gaze toward the floor rather than looking upward.
Reducing the number of moving parts often helps. Establish the legs first, then add the torso and arms once you feel steady.
If you are pregnant
Pregnancy can change balance, joint mobility, breathing comfort and the amount of space available for different positions as it progresses.
Rather than relying on a standard modification that is supposed to work for every pregnancy, work with a qualified prenatal yoga teacher or your healthcare professional when you need individualized guidance.
A wider or less compressed version may feel more comfortable for some practitioners, but pregnancy modifications should respond to the individual and stage of pregnancy rather than follow a universal formula.
If you have an injury or medical condition
An online pose guide cannot determine whether Extended Side Angle is appropriate for a specific injury, recent surgery or medical condition.
If you have an existing problem involving the knees, hips, back, neck or shoulders, or you are returning to practice after an injury or procedure, individualized guidance from an appropriately qualified healthcare professional or experienced yoga teacher may be more useful than trying to adapt the pose from general instructions.
Know the difference between effort and a reason to stop
Your legs may work strongly in Extended Side Angle. You may also experience a stretching sensation through areas such as the inner thighs or side body.
That is different from sharp, sudden or distinctly painful sensation.
Pain is not a cue to go deeper.
If something feels painful, unstable, numb, or produces an unusual sensation that concerns you, come out of the pose. If symptoms persist or you are uncertain about them, seek appropriate professional advice rather than using the pose to diagnose or treat the problem.
When in doubt, reduce one variable
You rarely need to abandon the entire pose because one element is not working.
Try:
come higher → shorten the stance → raise the bottom hand → change the upper arm → change the gaze
Then reassess.
If the pose becomes comfortable and controlled again, stay with that version. If it does not, come out.
Yoga poses are adjustable. Your body does not need to be adjusted to fit the photograph.
Teacher insight
One of the most revealing moments in Extended Side Angle happens when you stop trying to make the pose look deeper.
Raise the bottom hand one level. Make the contact with your thigh or block a little lighter. Reconnect with the back foot. Then reach through the torso again.
Very often, the pose becomes more active, not less.
This is a useful reminder that the visible endpoint of a yoga pose does not always tell you how well its actions are working.
In Utthita Parsvakonasana, the temptation is often downward: bend the knee more, reach the hand lower, get closer to the floor. But the more interesting direction may actually be outward.
Can you feel the back foot reaching away from the upper fingertips? Can the legs support you while the torso becomes spacious? Can the lower hand touch something without becoming responsible for holding you there?
When those relationships are present, Extended Side Angle can feel less like several alignment instructions happening at once and more like one connected action.
There is also value in occasionally practicing the pose differently from your habitual version.
If you normally put your hand on the floor, try a block.
If you always use a block, try the forearm-on-thigh variation.
If you automatically look upward, keep your gaze forward.
Changing one familiar element can reveal where you have been relying on habit rather than actively experiencing the pose.
Try this in your next practice
Enter Extended Side Angle and stay for a few breaths.
Instead of immediately adjusting what the pose looks like, notice three things:
Where am I grounding? Where am I working? Where can I create more space?
Then make just one adjustment.
This is a simple way to return to the principle running through the entire pose:
Ground. Stabilize. Lengthen.
Not as three rules to perfect, but as three things you can keep noticing each time you practice.
What this pose teaches
Extended Side Angle is a pose of reach, but the reach only becomes meaningful when there is something underneath it.
That is easy to forget when practicing yoga visually. We tend to notice the upper arm stretching overhead, the deep bend of the front knee or how close the lower hand comes to the floor.
But much of what makes Utthita Parsvakonasana work is less visible.
The back foot stays connected while the torso moves away from it. The legs provide stability while the side body creates space. One part of the body grounds while another reaches.
The extension comes from the support beneath it.
There is something useful in experiencing that relationship rather than simply understanding it as an alignment principle.
Less reaching, more connection
If you try to reach farther than your foundation can support, the pose often begins to fragment. The back leg becomes quiet. The lower hand takes more weight. The breath becomes less comfortable.
Come back slightly and those relationships can return.
This does not mean you should never challenge your range. It means that range becomes more useful when it develops from stability rather than replacing it.
Over time, the question can shift from:
How far can I go?
to:
How much of myself can I keep connected while I go there?
That is a different way of measuring a pose.
And it may be one of the more interesting things Extended Side Angle has to teach: sometimes creating more space begins by reaching less and feeling what is already supporting you.
Extended Side Angle Pose FAQs
What is Extended Side Angle Pose good for?
Extended Side Angle Pose combines lower-body strength, hip and side-body mobility, trunk control and coordination in one standing posture.
The bent front leg and active back leg create the foundation while the torso lengthens laterally. Depending on the variation, you may also experience movement through the hips, inner thighs, shoulders and side body.
Rather than thinking of it as either a strengthening pose or a stretching pose, Utthita Parsvakonasana is useful precisely because it asks you to coordinate both.
Do I need to put my hand on the floor in Extended Side Angle?
No. Your hand does not need to reach the floor.
You can rest your forearm lightly on the front thigh or place your hand on a block. These variations allow you to practice the essential actions of the pose without sacrificing stability or length simply to reach lower.
If touching the floor causes your chest to collapse, your back leg to become passive or your weight to fall heavily into the lower hand, use a higher support.
Should the bottom hand be inside or outside the front foot?
Both positions appear in variations of Extended Side Angle.
Bringing the hand to the inside of the front foot can be more accessible for some practitioners. Placing it outside the foot may require more range and can change how the torso and shoulder organize the pose.
Rather than choosing a position because it looks more advanced, use the one that allows you to maintain a steady front knee, active back leg and length through the torso.
A block can be used in either position when appropriate.
Where should I look in Utthita Parsvakonasana?
The gaze can be upward, forward or downward, depending on your balance and what feels comfortable for your neck.
Looking toward the upper hand is a common expression of the pose, but it is not required. If turning your head upward creates neck tension or makes you less stable, keep your gaze forward or toward the floor.
What is the difference between Extended Side Angle and Triangle Pose?
The clearest difference is the front leg.
In Extended Side Angle Pose, the front knee is bent. In Triangle Pose, the front leg remains straight.
Extended Side Angle also commonly places the torso on a diagonal with the upper arm reaching overhead, while Triangle typically uses a more lateral torso position with the upper arm reaching upward.
The two poses share aspects of their standing foundation but create distinctly different demands through the legs and torso.
Is Extended Side Angle a beginner pose?
Extended Side Angle can be appropriate for beginners because it is highly adaptable.
A beginner-friendly version can start from Warrior II with the forearm resting lightly on the front thigh and the upper arm reaching upward or overhead. A block can then be introduced when exploring a lower hand position.
Beginners do not need to work toward the floor immediately. Learning to maintain the feet, legs and torso while breathing comfortably is a more useful starting point.
What muscles does Extended Side Angle work?
Extended Side Angle involves multiple muscle groups rather than isolating one muscle.
The quadriceps and muscles around the hips help support and stabilize the legs. The gluteal muscles contribute to hip control, while muscles of the abdomen and back help support the torso as it moves laterally and rotates.
The precise muscular demands vary according to stance, depth and arm position, which is another reason different versions of the pose can feel noticeably different.
Related poses
Extended Side Angle becomes easier to understand when you see it as part of a family of standing poses rather than an isolated posture. The most useful connections are poses that share its foundation, prepare similar actions or offer a natural transition.
Warrior II — Virabhadrasana II
Warrior II is the closest companion to Extended Side Angle and one of the simplest ways to enter and exit the pose.
The feet and legs establish much of the same foundation. From Warrior II, you keep the front knee bent and back leg active while changing the position of the torso and arms.
If you lose your organization in Extended Side Angle, returning to Warrior II can give you a useful reset before trying again.
Triangle Pose — Trikonasana
Triangle and Extended Side Angle share a wide standing base but change the relationship of the front leg and torso.
In Triangle, the front leg is straight. In Extended Side Angle, it is bent.
Practicing them near each other can help you feel how changing one major joint action affects the rest of the pose rather than simply memorizing two different shapes.
Warrior I — Virabhadrasana I
Warrior I offers another way to develop strength and familiarity in a standing stance, although its orientation is different from Warrior II and Extended Side Angle.
The pelvis and torso turn more toward the front of the mat in Warrior I. Moving from Warrior I toward Warrior II therefore introduces an important transition: the stance and orientation reorganize before you move into Extended Side Angle.
High Lunge
High Lunge can be a useful preparation when you want to work with a bent front knee and active back leg before adding the wider orientation of Warrior II.
Because the back heel is lifted, the foundation feels different. Notice what changes when you later ground the back foot and open into Warrior II before moving into Extended Side Angle.
Reverse Warrior
Reverse Warrior can pair naturally with Extended Side Angle in a standing sequence because both begin from a Warrior II-type foundation while taking the torso in different directions.
Moving slowly between them lets you explore length through different sides of the torso while trying to preserve the stability of the legs underneath.
Half Moon Pose — Ardha Chandrasana
Half Moon introduces a much larger balance challenge, but it has a useful relationship with Extended Side Angle.
From a stable Extended Side Angle, you can eventually explore shifting weight toward the front foot and transitioning into Half Moon. The back leg that was helping anchor you to the floor now lifts, dramatically changing the balance requirement.
This is a good example of why the foundation you develop in standing poses matters. The shapes change, but the ability to organize support before reaching remains relevant.
For someone learning Extended Side Angle, however, there is no need to rush toward the balance. Warrior II and Triangle are usually the more useful relationships to explore first.
A simple family to remember
If you want to understand where Utthita Parsvakonasana sits within a standing practice, think:
Warrior I → Warrior II → Extended Side Angle → Triangle → Half Moon
This is not a required sequence or a hierarchy. It is simply a useful map of related poses and transitions.
As your standing practice develops, you begin to recognize these relationships. Instead of learning each asana as a separate set of instructions, you start noticing which foundations are shared, what changes from one pose to the next, and what remains constant.
That is ultimately more useful than memorizing shapes.
Final thoughts
Extended Side Angle Pose does not need to be measured by how deeply you bend the front knee, how far you rotate your chest or whether your hand reaches the floor.
A more useful measure is how the pose connects.
Can you still feel the back foot as you reach forward? Can the legs support you without asking the bottom hand to take over? Can you create length through the side body without compressing somewhere else?
This is why ground → stabilize → lengthen is such a useful way to approach Utthita Parsvakonasana.
Start with what supports you. Organize the pose from there. Then reach.
Some days that may mean your hand comes to the floor. On others, a block or forearm on the thigh may give you a more connected experience. Neither version needs to represent progress or regression.
The pose changes as your body, attention and practice change.
Perhaps that is one of the reasons Extended Side Angle remains interesting long after you have learned its basic shape. There is always another relationship to notice between effort and ease, grounding and extension, reaching farther and staying connected.
The floor was never the destination. The connection from the ground through the whole pose is what makes the reach possible.
References
This guide is written as practical yoga education rather than medical advice. For broader safety guidance and the few health-related points referenced in the article, YOGI TIMES consulted the following independent sources.
- National Center for Complementary and Integrative Health (NCCIH). Yoga: Effectiveness and Safety.
- Manjunath, N. K. Safety and Prevention of Injuries in Yoga. International Journal of Yoga. 2024;17(2):65–66. PMID: 39444673.
- Cramer, H., et al. Injuries and Other Adverse Events Associated With Yoga Practice: A Systematic Review of Epidemiological Studies.
- American College of Obstetricians and Gynecologists (ACOG). Exercise During Pregnancy.
Free Wellness E-Book
Find Your Zen!
Your Free Guide
To Wellness
Download Your Free Guide & Receive Weekly Inspirations From The Lifestyle Of a Modern Yogi!