Crow pose (Kakasana): A complete guide to your first arm balance by Michelle Young, founder of My Vinyasa Practice

Crow Pose is often the first arm balance students encounter, and for good reason. It’s empowering, playful, and challenges both body and mind in meaningful ways.
I remember the first time I experienced flight in Crow Pose. It wasn’t graceful, but it was grounding. In that moment, I discovered something more than strength. I discovered trust.
I began my yoga journey in 2004, shortly after giving birth to my son in Kuwait. Over the years, I’ve trained in alignment-based vinyasa yoga, yoga therapy, and anatomical dissection, and have worked with diverse students from clinical care teams to public classes in Austin.
In this guide, I’m drawing from my direct experience to help you build a safe and meaningful relationship with Crow Pose, whether you’re brand new or returning to deepen your practice.

Key takeaways: Crow pose (Kakasana)
- Crow Pose is accessible to most practitioners with preparation, warm-up, and proper alignment.
- Crow and Crane are different: Crow has bent elbows; Crane uses straight arms and more core strength.
- Fear of falling is common, and can be managed with props like blocks or a folded blanket.
- Variations like Crow on the back or with a block support different levels of strength and mobility.
- Progressions like Crow to Chaturanga or Headstand help build fluidity and confidence over time.
- Patience, presence, and practice matter more than “nailing” the pose.
What is Crow pose
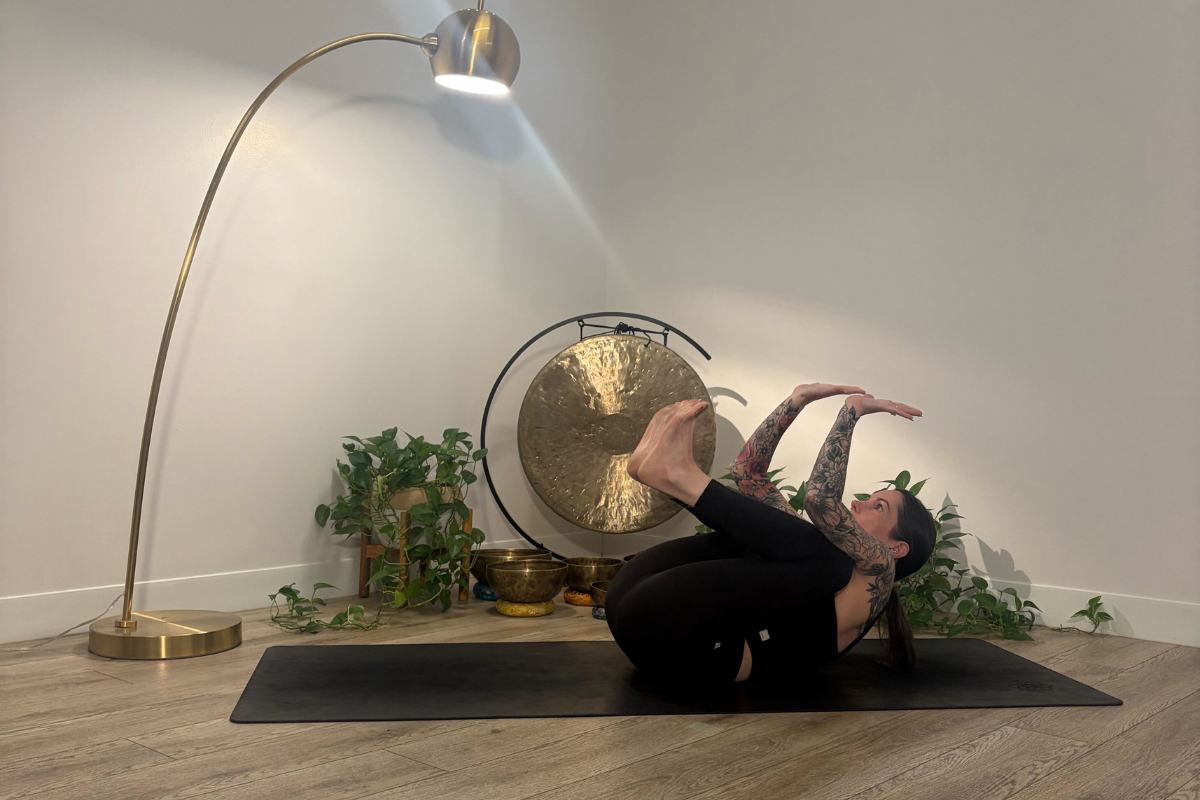
Crow Pose (Kakasana) is an arm balance that develops strength, coordination, and confidence. It involves bending the elbows and placing the knees on the upper arms while lifting the feet off the floor.
The body balances on the hands with the core fully engaged.
Many people confuse Crow Pose with Crane Pose (Bakasana). Though similar in shape, Crane is a more advanced posture with straight arms and a higher center of gravity. Crow, with bent elbows, offers more stability and is an ideal place to begin.
Why practice Crow pose
The benefits of Crow Pose go beyond physical strength.
Physical benefits
- Builds arm and shoulder stability
- Strengthens the core and deep stabilizers
- Increases wrist and hand resilience
Mental and emotional benefits
- Improves focus through balancing
- Develops perseverance
- Encourages a sense of play
In yoga therapy, I use Crow Pose to help clients rebuild trust in their bodies. It teaches that falling is not failure, but feedback.
How to do Crow pose step by step
Crow Pose requires attention to technique and breath. Begin with a warm-up that includes Malasana (yogic squat), plank, and wrist circles.
- Start in a squat with feet hip-width apart
- Place your palms on the mat, shoulder-width, fingers spread wide
- Bend your elbows back at a 45-degree angle
- Lift the hips high and come onto the balls of your feet
- Place your knees onto your upper arms near the armpits
- Gaze forward and begin to shift your weight into your hands
- Engage your core and lift one foot, then the other
- Press the floor away and find your balance
It’s normal to tip forward. Place a folded blanket or block in front of you as a safety net.
Crow pose vs. Crane pose: What’s the difference
In Crow Pose, the elbows are bent and the knees rest on the upper arms. This version is more accessible and requires less core lift.
Crane Pose (Bakasana) involves straight arms and a more vertical lift. It demands greater strength and balance and is usually introduced after Crow is stable.
Understanding the distinction helps students progress intentionally and safely.
Common mistakes and how to fix them
- Looking straight down instead of forward
- Flaring elbows wide rather than hugging in
- Jumping too quickly instead of shifting weight with control
Falling is part of learning. What matters is how you approach the process with presence and care.
Variations and progressions for Crow pose
To support a wide range of bodies and experiences, I often offer the following variations:
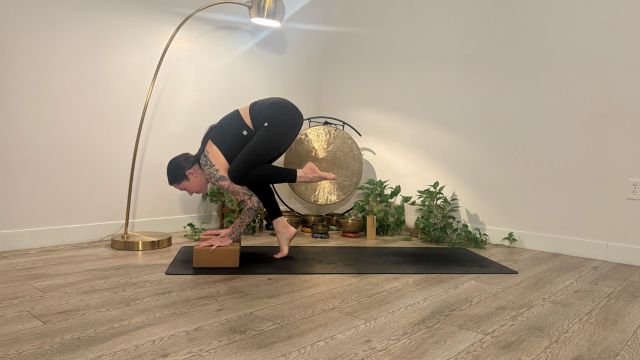
1. Crow Pose with a Block
Place a block under the feet to elevate the hips and reduce fear of tipping. This helps beginners feel the shape with more control.
2. Crow on the Back (Reclined Prep)
Lie on your back, bring the knees toward the arms, and engage the core. This develops strength without wrist pressure, ideal for therapeutic settings.
3. One-Legged Crow (Ekapada Bakasana)
From Crow, extend one leg back while keeping the opposite knee on the arm. This builds core control and balance.
4. Crow to Chaturanga Transition
Shift weight forward from Crow and lower slowly into Chaturanga. Only try this if you can hold Crow steadily.
5. Crow to Headstand (Tripod Transition)
Start in Crow. Slowly place your head on the mat between your hands and transition into a tripod headstand. This requires mastery of both poses and should be learned under guidance.
Crow pose for beginners: tips for success
- Warm up thoroughly, especially the wrists and shoulders
- Use props like blocks or a wall for support
- Practice on a soft but stable surface
- Don’t rush. Stay in the preparation steps until ready
- Work with a certified teacher if you have concerns or injuries
Thinking about deepening your yoga journey
My 200-Hour Online Yoga Teacher Training is a self-paced, Yoga Alliance-approved program designed to fit your lifestyle.
If you’re ready to move beyond just practicing and start sharing yoga from an authentic place, I’d love to support you.
Join my 200-Hour Online YTT here.
Who should modify or avoid Crow pose
Those with recent wrist, shoulder, or abdominal injuries should modify or postpone Crow Pose. Pregnant practitioners should consult with their healthcare provider. Safety always comes before shape.
Why Crow pose matters
When I teach Crow Pose, it’s not about showing off strength. It’s about showing up, for yourself, for the process, and for the moment. The first time you feel your feet lift off the ground, you realize balance is not about perfection. It’s about presence.
This pose has guided my own growth as a teacher, therapist, and student of yoga. It has humbled me, challenged me, and taught me how to fall safely and rise again.
Frequently asked questions about Crow pose
How long does it take to learn Crow Pose
Most students can begin to lift into Crow Pose within a few weeks of consistent practice, though true comfort and stability may take several months. Strength and trust develop gradually.
Is Crow Pose hard for beginners
Crow Pose can be challenging, but it’s accessible with the right approach. Using props and breaking it down into steps makes it much more approachable.
What if I’m afraid of falling
Fear is completely normal. Try placing a pillow or block in front of your head and shift your gaze forward. Falling is part of learning, not a failure.
Can I do Crow Pose if I have weak wrists
Yes, but you should build up strength slowly. Wrist warm-ups and variations like Crow on the Back are helpful. Always listen to your body and modify as needed.
Ready to teach what you love
Whether you want to deepen your practice or become a certified instructor, our flexible 200-Hour Online YTT helps you integrate yoga into your daily life while staying connected to your roots.
Get started take my Online YTT here today.
Conclusion
Crow Pose is a rite of passage for many yoga students, but it doesn’t need to be rushed or forced. Whether you’re exploring it for the first time or refining your balance, it’s a powerful teacher in and of itself.
If you’re seeking support, I offer donation-based classes, yoga therapy, and teacher training at My Vinyasa Practice, both in Austin and online. You’re invited to grow at your own pace, in a space that honors your journey.
With care,
Michelle Young
Founder, My Vinyasa Practice
C-IAYT, Yoga Therapist, Educator
Free Wellness E-Book
Find Your Zen!
Your Free Guide
To Wellness
Download Your Free Guide & Receive Weekly Inspirations From The Lifestyle Of a Modern Yogi!

I very delighted to find this internet site on bing, just what I was searching for as well saved to fav
Loved the way this was explained. Clear and not too technical which I really appreciate.
Nice post. I learn something totally new and challenging on websites
This was very helpfull, especially the part about fear and balance. Crow still scares me a bit honestly.
Really interesting explanation. I’ve been practicing yoga for a while and still find balance poses tricky. The small details mentioned here are actually very useful.
Very well presented. Every quote was awesome and thanks for sharing the content. Keep sharing and keep motivating others.
I like how the article breaks things down instead of just saying “engage your core” like many yoga guides do. It’s easier to understand what to actually do. Makes me want to give the pose another try.
This was a very helpful read. Crow Pose always looked intimidating to me but the way it’s explained here makes it feel more approachable. I didn’t realize how much arm positioning and focus matters.