Parivrtta janu sirsasana (Head-to-knee pose): A complete guide for your practice
Parivrtta Janu Sirsasana aka Revolved Head-to-Knee Pose is one of my favorite poses not only to practice, but to teach. And honestly, this one deserves way more credit than it gets.
This pose shows up often in forward bending and seated sequences and while it looks simple from the outside, I think that’s exactly why people underestimate it. But as a yoga teacher, I can tell you: this pose has a way of humbling even the most experienced practitioners. The asymmetry alone will tell you more about your body in 30 seconds than a week of symmetrical stretches.
So whether you’re a student who’s been doing this pose for years without really feeling it, or a teacher looking for fresh ways to cue it let’s dive in.
Explore poses by anatomy, benefit, and level to understand your body and practice more intentionally.
What is parivrtta janu sirsasana?
Parivrtta Janu Sirsasana is a seated forward bend but an asymmetrical one that includes elements of twists, side bends, hamstring openers, and hip opening.
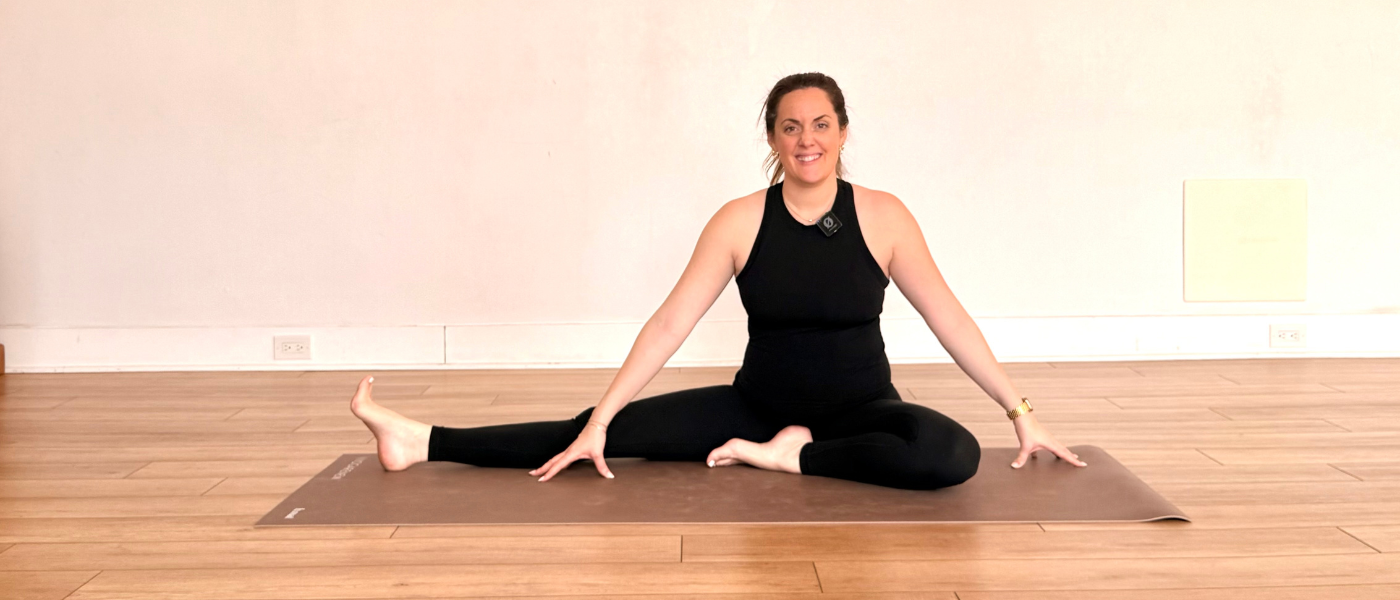
You start in Staff Pose (Dandasana) with both legs out in front of you. Then you bend one knee and bring the sole of that foot to rest on the floor with the heel close to the pubic bone, which creates an external rotation in the hip of the bend leg. From there, the spine lengthens and side body lengthen to fold forward over the extended leg and then the chest turns towards the ceiling.
That’s it. Setup-wise, it’s pretty straightforward.
But here’s the thing because each side of your body is doing something different, you literally cannot coast through this pose. One side will always feel tighter, more resistant, or just off. And that’s not a problem. That’s information. Really useful information about what’s going on in your body that day.
“Parivrtta” means revolved, “Jau” means knee, “Sirsa” means head so yes, technically the goal is to bring your head toward your knee and turn your chest. But honestly? This attention to nuance and individual variation is something I also bring into my online yoga teacher training, which YOGI TIMES recently explored in a deeper review of my teaching approach and philosophy.
Anatomy & alignment: What’s actually happening in this pose
Let’s get into the nerdy stuff because understanding the anatomy makes you a better practitioner and a better teacher.
I’ll use right leg extended, left leg bent as the reference point just flip it for the other side.
The right leg is where the main hamstring stretch lives. Keep the right knee extended but not locked there’s a real difference and press through the outer edges of the right foot to stabilize the whole leg. The right thigh should stay active and engaged the entire time; a passive leg is a wasted opportunity. Keep checking that the right knee and right foot are aligned and tracking properly.
The left leg is doing its own work. The left heel draws in toward the groin, and the left thigh externally rotates, allowing the sole of the left foot to settle onto the floor with the left heel close to the pubic bone (think like a siddhasana or child’s pose foot). The left knee can relax toward the floor but if it’s hovering, prop it. That left inner thigh opening is key to the whole pose feeling good, and it’s often the tightest spot people hit.
Your hip flexors kick in to stabilize as you bend forward, and your back muscles are working constantly to keep you from collapsing into the fold and supporting you as you lengthen through the spine and twist. This is an active pose, even when it looks slow and quiet from the outside.
Two spots where people almost always hold tension: the hamstring of the right leg and the hip of the left leg. For the left hip, encourage that external rotation rather than forcing it open. For the pelvis, keep both sit bones grounded and level the moment it starts shifting, you lose the integrity of the whole shape. Yoga props, like a blanket or block, can be really helpful here. The right side of the pelvis should gently draw back, which deepens the stretch and prevents torque in the spine.
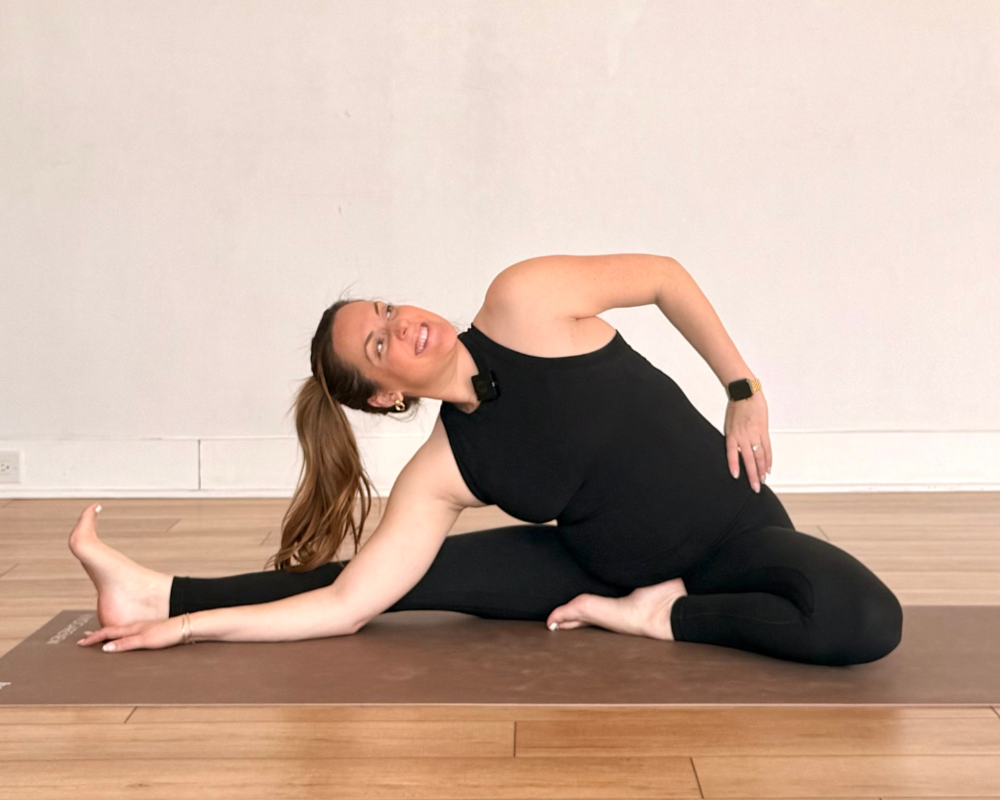
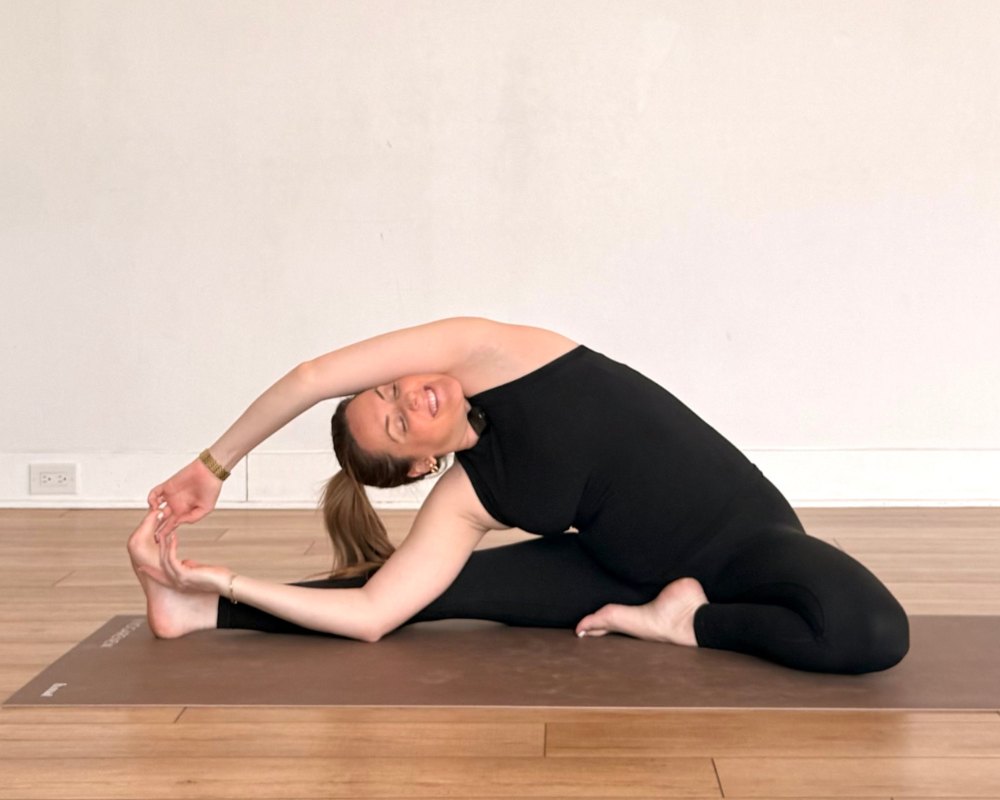
As you fold forward, here’s what else to keep in mind: your left hand reaches toward the right foot (the left side of the body lengthens long) as your left arm extends forward over your head.
Your right arm can rest gently inside the right knee for support. Your bottom shoulder stays in light contact with the inner knee, the rib cage lengthens and expands, and your chest turns and rotates towards the ceiling. That chest-forward action, combined with engaged back muscles, is what makes this a safe and effective forward bend and heart opener rather than just a collapse.
Length first. Always. Then fold.
This combination is very similar to what you build in Triangle Pose (Trikonasana), especially through the side body and hamstrings.
How to Parivrtta Practice Janu Sirsasana: Step-by-Step
- Start in Staff Pose (Dandasana) both legs extended, leg straight, sitting tall.
- Bend your left knee and bring the sole of your left foot towards your pubic bone with the top of your foot rotating down towards the floor (if your left foot doesn’t reach the floor comfortably, tuck a blanket underneath the left knee).
- Inhale and get tall really lengthen through your spine before anything else.
- Exhale and hinge forward from your right hip not your waist, your hip and begin to reach your right hand inside of your leg as you fold forward.
- Reach your arm over your head and stretch your hand towards your right foot, possibly grabbing hold of the foot if it’s available.
- The right hand can then also reach towards the foot while keeping the right forearm down onto the floor.
- The right ribs move underneath the body so the left ribs can turn upwards so the chest moves towards the ceiling.
- Stay for several breaths, keeping the right leg active, the left side long, and the fold intentional.
- Inhale to come back up slowly, then switch side left leg straight, right leg bent
A note I give every single student: you don’t need to reach your foot. If grabbing your foot means your spine rounds into a C-shape, back off. Your hamstrings and lower back will thank you and you’ll actually get more out of the pose. Just keep reaching fully through the top arm.
Variations & modifications
This is one of those yoga poses that can genuinely meet you where you are as long as you let it.
If your hamstrings are tight:
- Keep the straight leg slightly soft (micro-bend in the right knee)
- Loop a strap around your right foot so you’re not straining to reach
If your hips feel restricted:
- Sit on a folded blanket to tilt the pelvis forward this is a game changer for a lot of people
- Place a block or rolled blanket under the bent knee for support.
Discover yoga poses designed to open your hips, release tension, and improve mobility step by step.
If you want something gentler:
- Stay more upright and focus on length rather than depth this is a completely valid way to fold forward
If you’re ready to explore more:
- Work on gradual depth while keeping the spine long (no forcing, ever)
- Try adding a virasana leg variation which can help to make the side body lengthen more accessible but adds the challenging element of quadricep opening in the bent leg.
There’s no “better” version here. The best version is the one where you’re actually breathing and actually feeling something not just performing a shape.
Deepening the pose (without forcing it)
I say this to my students all the time: deepening a pose isn’t about pulling yourself further. It’s about refining your awareness.
When you want to go deeper in this forward fold:
- Keep the straight leg fully engaged right thigh active, right foot flexed.
- Lengthen through both sides of the waist the bottoms ribs especially love to collapse.
- Lead with your chest, not your head this keeps the spine long and the stretch more effective.
- Use your breath inhale to create length, exhale to soften a little deeper into the forward bend and turn the chest more.
Never forced. Always intentional.
Common mistakes (And how to fix them)
Let me save you some frustration:
Rounding the back → Come up higher. Keep the leg straight and use a strap if you need to. Length in the spine is non-negotiable.
Forcing the stretch → Ease off. You want sensation, not strain. There’s a difference and your body knows it.
Letting the right leg go passive → Flex the right foot, engage the right thigh. An active leg changes the whole pose.
Uneven hips → Press both sit bones down evenly. If one keeps lifting, try sitting on a blanket.
Small adjustments, big difference. That’s the magic of alignment work. That idea of subtle adjustments creating major shifts is something that also came up in this thoughtful interview with Nicolas Goudy on YOGI TIMEWS around movement, awareness, and the deeper layers of practice.
Teaching cues for yoga teachers
When I’m cueing Parivrtta Janu Sirsasana, I keep it simple and specific. Here’s what I reach for most:
Alignment cues:
- “Lengthen your spine and side body before you fold find the space first”
- “Lead with your chest turning up, not just your head”
- “Keep your right leg alive flex that right foot”
- “Let the left heel draw in, externally rotate your left thigh to open your hip”
Verbal cues for the experience:
- “Find your edge and breathe there don’t push past it”
- “Let the pose come to you”
What to watch for:
- Spine collapsing (super common especially in students with tight hamstrings)
- Right knee locking out
- Left heel creeping away from the groin
On hands-on assists: less is more. A gentle touch to encourage spinal length is usually all you need. Always ask first, always go lightly.
Sequencing ideas
Parivrtta Janu Sirsasana is incredibly versatile I use it in so many different types of classes.
It fits beautifully in:
- A seated forward fold series or forward bend flow
- A hip-opening sequence
- A slower, introspective practice (yin or restorative)
- As a preparatory pose right before practicing compass pose
- A cooldown before Savasana
Poses that pair well with it:
- Baddha Konasana (helps to open the hips)
- Utthita Parsvakonasana (preps the lengthening of the side body)
- Trikonasana (opens the hamstrings and front leg)
- Vrksasana (encourages the deep bend in the knee)
Think of it as a bridge between effort and ease which honestly describes so much of what we’re doing in yoga anyway.
Preparatory & counter poses
Before Parivrtta Janu Sirsasana, warm up with:
- Siddhasana with side body stretch (preps the bent legs and side body lengthening)
- Supta Padangusthasana (gentle hamstring opener)
- Utthita Parsvakonasana (emphasizes the lengthening of the side body using a more active standing pose)
- Baddha Konasana (preps the bent-knee hip position)
After Parivrtta Janu Sirsasana, neutralize with:
- Paschimottanasana (a symmetrical forward bend to balance things out)
- Balasana (because everyone needs Child’s Pose after deep forward folds)
Props & gear
Real talk: props are not a sign that you’re “not good enough” at yoga. They’re a sign that you understand alignment which is actually more advanced.
What to use and why:
- Strap loop it around the foot of your extended leg if reaching causes your spine to round. Non-negotiable for tight hamstrings.
- Blanket or block under the hips tilts the pelvis forward and makes the whole forward fold more accessible
- Rolled blanket under the bent knee reduces strain on the left knee or right knee depending on which side you’re on.
- Block on inside of extended leg can help to bring the floor closer from the front arm.
For mat shopping: natural rubber, cork, or recycled materials are great options if you’re looking for something eco-conscious.
A few words on the name
Quick Sanskrit sidebar because I love this stuff:
Parivrtta = revolved Janu = knee. Sirsa = head. So Revolved Head-to-Knee Pose is literally what this shape is asking of us.
One thing that trips people up: “Sirsasana” is also the name for Headstand. Same word, totally different pose. In the context of Parivrtta Janu Sirsasana, it just refers to the action of bringing the head toward the knee in a seated forward bend. Context is everything.
Final thoughts
Here’s what I want you to take away from all of this:
Parivrtta Janu Sirsasana is one of those yoga poses that looks simple until you actually start paying attention. And when you do? It becomes something way more interesting than a hamstring stretch.
It becomes a practice in noticing. In patience. In showing up for yourself exactly as you are today not where you were last week, not where you want to be next month. Right now.
A lot of these same ideas around awareness, embodiment, and slowing down also came up in this conversation with Patrik Franco on YOGI TIMES, which I think every teacher and practitioner can learn from.
So next time you come into this head to knee pose, slow down. Don’t rush the fold. Breathe into it.
Because that’s where the real work happens and honestly, that’s where yoga gets good.
Research has shown that regular yoga practice can support flexibility, reduce stress, and improve overall body awareness, which is exactly what poses like this help develop. For example, you can explore findings from this study published by the National Institutes of Health on the broader benefits of yoga practice.
Free Wellness E-Book
Find Your Zen!
Your Free Guide
To Wellness
Download Your Free Guide & Receive Weekly Inspirations From The Lifestyle Of a Modern Yogi!